Showing posts with label ecore. Show all posts

Tuesday, April 20, 2010

RegEx to Validate UML Stereotype Attributes

Goal


By the end of this tutorial, we will have a technique for restricting UML Stereotype values with regular expressions using the Eclipse UML2 Tools and Ecore ExtendedMetaData.

Create a UML Profile


First, we will need to install the Modelling - > UML2 Tools SDK from the Galileo update site. Make yourself a peanut butter sandwich while you wait for the download, or if you already have the tools, then eat a piece of chocolate as a reward for not eating all those calories.

Our project is to create a Stereotype called Contact, which extends UML::Actor. A Contact is an Actor with contact information, which, in this case, is a single phone number. A US phone number can easily be validated with a regular expression. For this project, we can assume that all the Actors we will ever deal with will have US phone numbers.

We will start off by creating a plain ol' project, here called UML Regex Validation, and in this project, we will create a new UML Profile Definition, RegexValidation.profile.uml, with a Profile Model object as the root.
Since a Contact is an Actor, we will import uml::Actor from the UML Editor -> Profile -> Reference Metaclass menu.
Now we can create our Contact Stereotype and extend uml::Actor from the UML Editor -> Stereotype -> Create Extension menu.
We now have a simple Stereotype that we can apply to an Actor.
From the UML Editor -> Profile -> Define menu, we will generate our initial RegexValidation Ecore UML MetaData.

Test The Stereotype


We can create an Activity Diagram file, RegexValidationTest.uml, with a Package as the root. In the root Package, Contacts, we will create an Actor. Some call him Tim.
From the UML Editor menu, we will load the resource RegexValidation.profile.uml and apply the Profile for RegexValidation to Contacts. We are now ready to apply the RegexValidation::Contact Stereotype to Tim.
Now that we know that we can apply the Profile and the Stereotype, we will remove the Profile and Stereotype applications in RegexValidationTest.uml. When we re-define our Profile, the XMI IDs will also all be re-generated and these Profile and Stereotype applications will be invalidated.

The Restricted Stereotype Attribute


In RegexValidation.profile.uml, we will create our custom Primitive Type, USPhoneNumberType.
The General of this type should be UMLPrimitiveTypes::String.
Now we can add an EAnnotation to the USPhoneNumberType, with source value http:///org/eclipse/emf/ecore/util/ExtendedMetaData.
We will set the ExtendedMetaData Details as follows:

  • name -> USPhoneNumberType

  • baseType -> http://www.eclipse.org/emf/2003/XMLType#string

  • pattern -> 1?\W*([2-9][0-8][0-9])\W*([2-9][0-9]{2})\W*([0-9]{4})(\se?x?t?(\d*))?


This particular US phone number regular expression is based on the NANP specification.

We will also need to apply the Ecore Profile to the RegexValidation Profile in order to Stereotype the USPhoneNumberType as an Ecore::EDataType. We will send Ecore a hint that the USPhoneNumberType Instance Class Name should be java.lang.String.

Now, we can create an Owned Property, PhoneNumber, in the Contact Stereotype, and its type can be RegexValidation::USPhoneNumberType.

We will again Define our RegexValidation Profile from the UML Editor menu, but now we must explicitly Process the Annotation Details in the configuration dialog. The default configuration simply reports on Ecore MetaData.
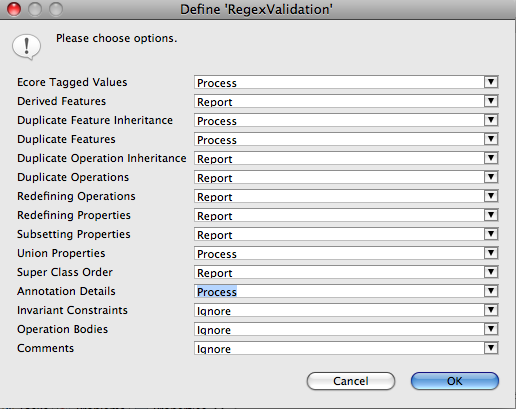
Process Annotation Details

If you are curious, the details section of the status dialog should indicate what MetaData has been processed.
The generated UML MetaData Definition will now include an EDataType for the USPhoneNumberType, which is restricted by our NANP phone number pattern.
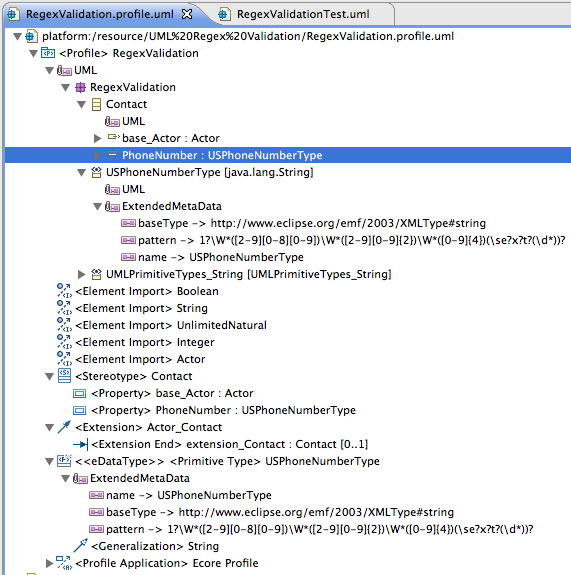
The Defined UML Ecore Package with Extended MetaData

We can now re-open our RegexValidationTest.uml, re-apply the RegexValidation Profile to the Contacts Package, and re-apply the RegexValidation::Contact Stereotype to Tim, the Actor.
We should now see our new PhoneNumber attribute in the Properties View.

Try entering an invalid phone number, such as 123-456-7890, in the Properties text field. What do you see? When you press enter, is the invalid value bound to the attribute?
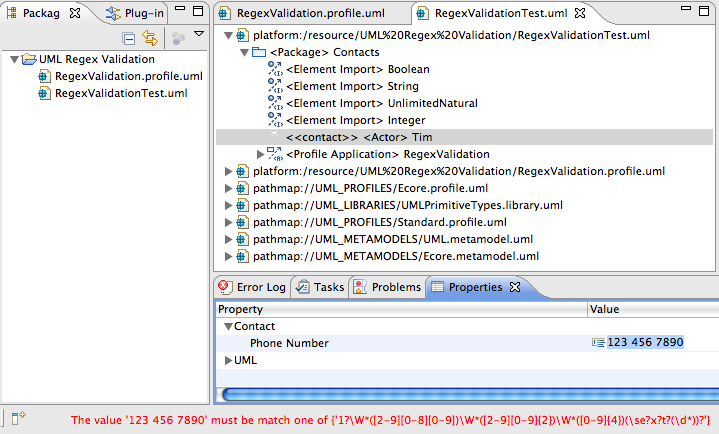
Invalid Phone Number Error

Now try entering a valid phone number, such as 555-555-5555. What happens?
Valid Phone Number

Common Types


With the technique outlined above, common regular expression patterns can be easily applied to more UML Stereotype attributes through Ecore MetaData: URIs, email addresses (although, the more complete regex has given me the SPOD in Eclipse in the past), or any number of other publicly available regular expressions.

Next


Now that we have a way to constrain stereotype attributes with a RegEx, wouldn't it be swell if there were a way to test that the restrictions work as expected?

Tuesday, July 29, 2008

ODA Ecore Getting Started Guide -- Part Kettő

Note: this post is a continuation of The ODA-Ecore Getting Started Guide and assumes that you are familiar with its contents and the examples presented therein.

Creating a Master-Details Report


Suppose we want to report on all the Writers and their Books in a model.  Each Writer's name should appear in the Master part of the report.  Each of the Writer's Books should appear as a Detail and should display the Title, Number of Pages and the Category for the Book.

There are at least two solutions with the current implementation of the enablement plug-in.

EReference Resolution

The ODA-Ecore enablement plug-in supports EReference resolution. For any EObject that contains a reference to another EObject, it is possible to display the value of a particular EAttribute of that EReference (or an EAttribute of an EReference to an EReference, etc.). It is also possible to display the value of the full EReference itself (which is just a toString() of the EObject that is referenced).  A user selects EAttributes of EReferences when creating a new Data Set in the Data Set Columns Wizard Page.  Collections of References are returned as a <cr>-delimited String of the selected EAttributes for an EReference. The more deeply nested the EAttribute or EReference, the more dificult interpretation of the results becomes, which is why this method is prefered only in simple cases.


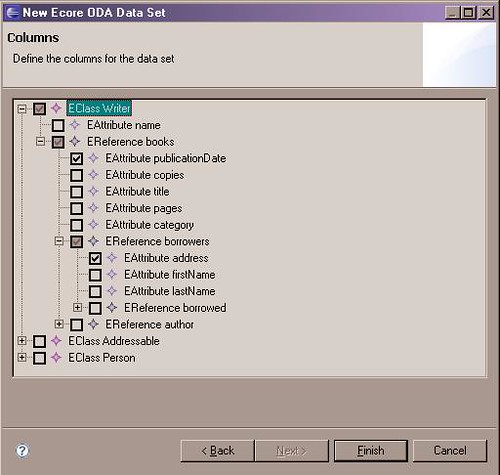
In this selection, we have chosen to output the publicationDate of any books written by a particular Writer, along with the address of any borrowers of the books written by the Writer.

Using EReferences is a simple solution, but it is limited in the general case. For such a simple use case, it will satisfy our needs, however.
From the Query Wizard Page, select Writer as the Invariant.
As your Boolean Query, use "self.oclIsKindOf(Writer)".
From the Columns Wizard Page, select

  • Writer::name
  • Writer::books::title
  • Writer::books::pages
  • Writer::books::category

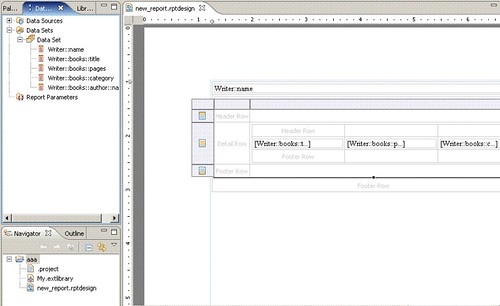
In the BIRT report, we will insert a new table with 1 columns and 2 details. The first details row will be the Master part, the second will be the Details part.
In column 1 of the first detail row, we will drag Writer::name from the Data Set.
In the second detail row, we will insert a new table with 2 columns and 1 detail. The first column is for spacing, the second will contain the EAttribute values (for the Details part).
In the detail row of the second column of the nested table, we will insert another table with 3 columns and 1 detail row.
Finally, into these 3 columns, we will drag Writer::books::title, Writer::books::pages and Writer::books::category from the Data Set.
We could remove the header information and re-space the columns to get the layout of the information that we want.


The Layout of the Report using EReference Resolution for Master-Details display.


We have achieved our goal using three nested tables and a single query that resolves EReferences. 

Joining ResultSets

Parameterizing the BooleanOCLQuery and and using multiple joined data sets are solutions for more complex situations.

each ? in the query is replaced with the input parameters in order (the first ? is replaced with the first parameter, the second ? is replaced with the second parameter, etc.). Named parameters are not yet supported.

For the example stated above (a Master-Details table of each Writer's name as the Master with information about all the Writer's Books as the Detail.)
1. Create a DataSource and point it to the Extlibrary file.
2. Create a DataSet called "Writers Data Set" with these features:

  • Invariant -- Writer
  • Query -- self.oclIsKindOf(Writer)
  • Selected Column -- Writer::name

3. Create a DataSet called "Books Data Set" with these features:

  • Invariant -- Book
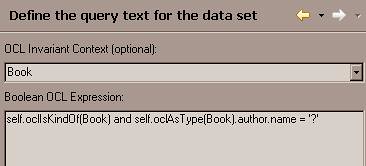
  • Query -- self.oclIsKindOf(Book) and self.oclAsType(Book).author.name = '?'
  • Selected Columns -- Book::title, Book::pages, Book::category, Book::author::name (just to prove out what we are doing)
  • Parameters -- input param1 with default value 'James Fenimore Cooper' (make sure you use quotes or you will get a Javascript error).

4. Drag the Writers Data Set into the Report and name the Table "Writers List". This is the Master part.
5. Add a column to the right of the Writer::name column.
6. Drag the Books Data Set into the empty column. This is the Details part.
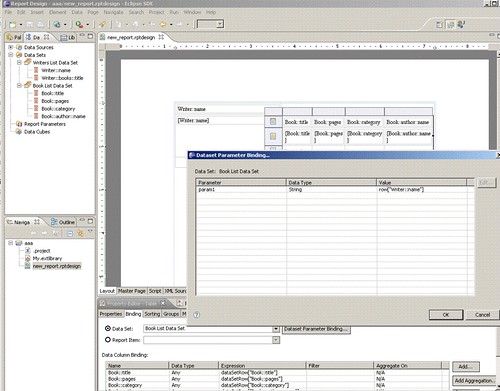
7. Select the Books Data Set Table and add a Data Set Parameter Binding from Writer::name to param1.

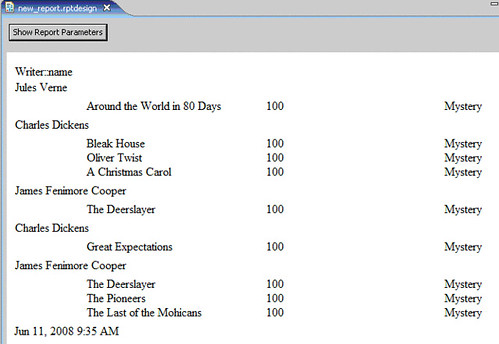
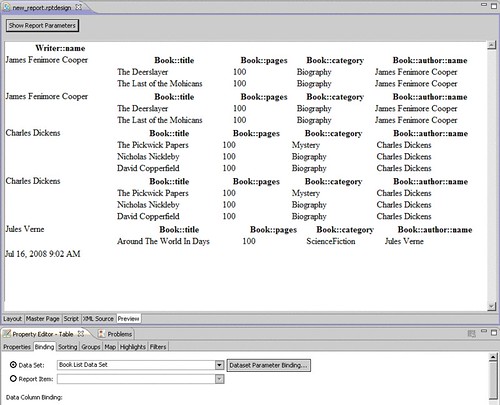
8. Select Preview and you should now see a Master-Details report that lists the Writers' names in the first column and, for each Writer, a list of the Books associated to that Writer in a nested table in the right column.


Sorting Results


Suppose we need to sort or filter the results of a query. As only Boolean OCL queries are supported by the enablement plug-in, the driver does not currently support a SORT BY feature in the OCL query itself. Fortunately, BIRT's sorting and filtering mechanism for groups should satisfy many of our needs.
Suppose we want to find all the Writers in the object graph and print their names. In the Wizard to form the DataSet, we would choose "Writer" from the dropdown, our query would be "self.oclIsKindOf(Writer)", and we would choose to report on the column "Writer::name".
For the report, we can drag the Data Set from the Data Explorer to the report.


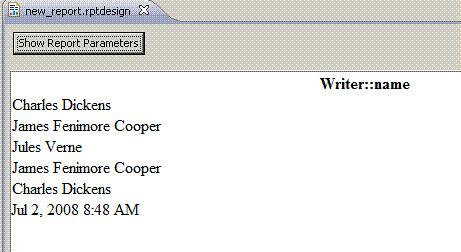
The unsorted preview of this report.

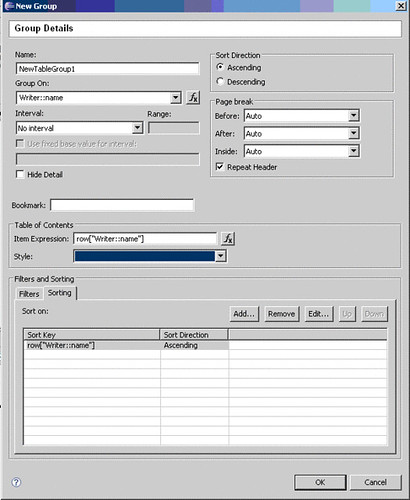
In the Detail Row, instead of using "[Writer::name]", we will delete the Detail row, right click and select "Insert Group". On the Group Details wizard, we will select the item to group on (here, "Writer::name") and the type of sorting we want to perform (here, "Writer::name" in ascending order).


The configuration of filters and sorters.

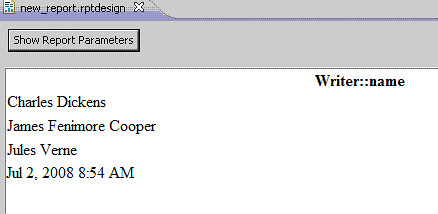
The resulting report should consistently contain sorted, unique results.


Duplicates are removed and writers' names appear alphabetically.

Saturday, May 31, 2008

ODA Ecore Driver Backport

This post is a continuation of the description of the ODA Ecore Enablement plug-ins, now available for download from the Eclipse datatools incubator.
Recently, the ODA Ecore plug-ins were backported for JDK 1.4 and Eclipse 3.2 compatibility. This project has been moved into the datatools incubator attic directory. The same functionality is there in both sets of plug-ins, but there is no guarantee of future support for the archived version.
The primary difference between the Europa version and the backport is the backport's use of the now-deprecated org.eclipse.emf.ocl API for running ocl queries that has since been replaced by a new org.eclipse.ocl query parser. The backport does work in Europa, but the newer, EMF 2.3-dependent version of the plug-in allows shorter, context-free ocl query syntax.

Set up the ODA Ecore Driver in Eclipse 3.2


Download Eclipse 3.2 Callisto and unzip it.
Download EMF 2.2 and unzip it into your Callisto directory.
Download the EMF 2.2 examples and unzip them into your Callisto directory if you want to try the example described in the ODA Ecore Getting Started Guide.
Download EMFT Validation 1.0.1 and unzip it into your Callisto directory.
Download EMFT Transaction 1.0.2 and unzip it into your Callisto directory.
Download EMFT OCL 1.0.1 and unzip it into your Callisto directory.
Download EMFT Query 1.0.1 and unzip it into your Callisto directory.

After starting this installation of Eclipse 3.2, install the following plug-ins from the Callisto discovery site:
Database Development -> Datatools Platform Enablement 0.9 and its dependencies
Charting and Reporting -> Eclipse BIRT Report Designer Framework 2.1 and its dependencies (to run the example described in the ODA Ecore Getting Started Guide).

Import The Archived ODA Ecore Driver projects from CVS.
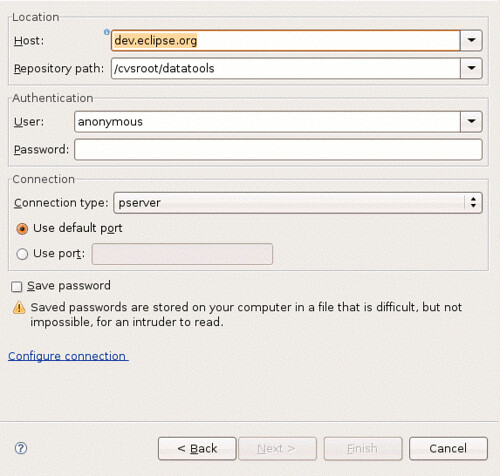
The Host is dev.eclipse.org
The Repository path is /cvsroot/datatools
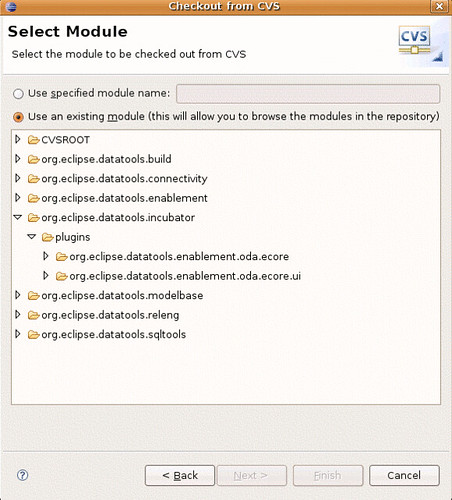
Browse to org.eclipse.datatools.incubator/attic, select
  • org.eclipse.datatools.enablement.oda.ecore
  • org.eclipse.datatools.enablement.oda.ecore.ui
and check the projects out to your workspace.

Because the plug-ins are JDK 1.4 compatible, if you have a later version of the JDK, you might want to set your Java Compiler Preference to 1.4 Compliance to eliminate any compiler warnings.
Everything should be set-up correctly, and you should now see no compiler errors.

Try the ODA Ecore driver extlibrary Example


We can now launch a new Eclipse runtime and set up an initial BIRT report and .extlibrary file in our workspace as described in the example from the ODA Ecore Getting Started Guide.
Data source creation is the same, so we can follow the instructions without changes.
Data Set creation is slightly different because the query syntax for the backport is more strict. The boolean query in the example, self.oclIsKindOf(Writer), will work for the backport. The differences show up with more complex queries.
Suppose we want to find only references to James Fenimore Cooper. While we can use self.name = 'James Fenimore Cooper' in the latest version of the plug-in, this query will not work in the backport. The query must read self.oclIsKindOf(Writer) and self.oclAsType(Writer).name = 'James Fenimore Cooper'. The newer org.eclipse.ocl query parser can handle the stricter old-style query, but the older org.eclipse.emf.ocl parser cannot properly interpret the shorter context-free query.
Aside from that slight difference in query syntax, the plug-ins currently have the same features. So if you have the restriction that you must continue using Eclipse 3.2 or Java 1.4 and cannot upgrade to Eclipse 3.3 or EMF 2.3, but you need the features exposed by the ODA Ecore driver, you have this backport as an option!

Thursday, April 10, 2008

ODA Ecore Getting Started Guide

Overview


Now that the ODA Ecore enablement plug-ins are in the Data Tools Project incubator at Eclipse, a quick-start guide seems in order.
The Oda Ecore enablement plug-in provides a JDBC-like interface for querying object models defined with EMF. These queries are written with OCL and use the EMF Model Query OCL bridge.
The Oda Ecore UI plug-in contributes two Wizards for configuring BIRT reports: the first allows specification of a Data Source; the second provides a graphical interface for constructing queries.

Dependencies


In order to use the Oda Ecore enablement plug-in, you will need to install the following dependencies:

Datatools Connectivity
EMF Query
EMF Model Query OCL Integration
The Data Tools Platform Enablement for JDBC

In addition, to run the example, you will need to install the following plug-ins:
BIRT (for reporting query results)
EMF Examples (for the extlibrary sample)

This example has been tested so far with Ganymede M5 and M6.

Enablement Plug-ins In CVS


First, we will need to download the Oda Ecore enablement plug-ins from CVS.
File -> Import -> Projects from CVS
The Host is dev.eclipse.org
The Repository path is /cvsroot/datatools
Unless you are a committer, the User is anonymous.
Checkout from CVS at dev.eclipse.org

Browse to org.eclipse.datatools.incubator/plugins, select
org.eclipse.datatools.enablement.oda.ecore
org.eclipse.datatools.enablement.oda.ecore.ui
and check them out to your workspace.
Find the ODA Ecore enablement plug-ins in the datatools incubator.

Model File


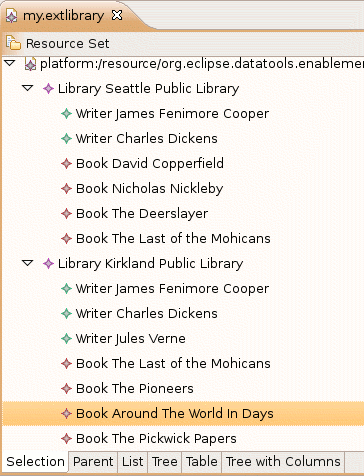
You will also need a model file. You can create one yourself using New -> Other -> Example EMF Model Creation Wizards -> EXTLibrary Model or you can use the sample model below, which sets up two libraries with an assortment of books, some of which are in one library or both libraries, and authors, some of whom are also in one or both libraries:

my.extlibrary


<?xml version="1.0" encoding="UTF-8"?>
<xmi:XMI xmi:version="2.0" xmlns:xmi="http://www.omg.org/XMI" xmlns:xsi="http://www.w3.org/2001/XMLSchema-instance" xmlns:extlib="http:///org/eclipse/emf/examples/library/extlibrary.ecore/1.0.0">
<extlib:Library address="1000 4th Ave, Seattle, WA 98104" name="Seattle Public Library">
<stock xsi:type="extlib:Book" title="David Copperfield" category="Biography" author="/0/@writers.1"/>
<stock xsi:type="extlib:Book" title="Nicholas Nickleby" category="Biography" author="/0/@writers.1"/>
<stock xsi:type="extlib:Book" title="The Deerslayer" category="Biography" author="/1/@writers.0"/>
<stock xsi:type="extlib:Book" title="The Last of the Mohicans" category="Biography"/>
<writers firstName="James" lastName="Fenimore Cooper"/>
<writers firstName="Charles" lastName="Dickens" books="/0/@stock.1 /1/@stock.3 /0/@stock.0"/>
</extlib:Library>
<extlib:Library address="308 Kirkland Ave, Kirkland, WA 98033" name="Kirkland Public Library">
<stock xsi:type="extlib:Book" title="The Last of the Mohicans" category="Biography" author="/1/@writers.0"/>
<stock xsi:type="extlib:Book" title="The Pioneers"/>
<stock xsi:type="extlib:Book" title="Around The World In 80 Days" category="ScienceFiction" author="/1/@writers.2"/>
<stock xsi:type="extlib:Book" title="The Pickwick Papers" author="/0/@writers.1"/>
<writers firstName="James Fenimore" lastName="Cooper" books="/0/@stock.2 /1/@stock.0"/>
<writers firstName="Charles" lastName="Dickens"/>
<writers address="" firstName="Jules" lastName="Verne" books="/1/@stock.2"/>
</extlib:Library>
</xmi:XMI>


my.extlibrary example file
Feel free to modify the model file with the extlibrary example editor.

Launch Eclipse


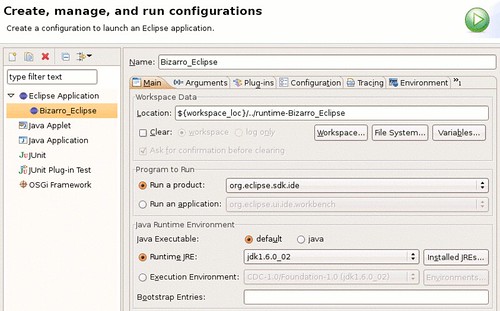
There is nothing special to do here. Just open the Run Configurations Dialog, create a new Eclipse Application runtime configuration, if you do not already have one, and hit Run.
An example Eclipse runtime configuration.

BIRT Report


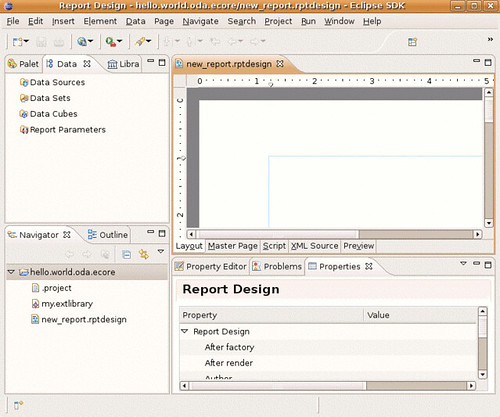
In this new Eclipse runtime, create a new General project. Here we can call it hello.world.oda.ecore. Drop your .extlibrary sample file into the new project. Now create a new Blank BIRT Report and switch to the Reporting perspective. Here we use the Wizard's default name for the report. It should be automatically opened in an editor.
A new BIRT report in your worspace.

Data Source


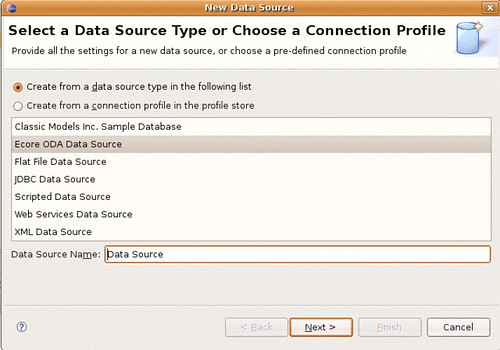
In the Data Explorer View, specify a new Data Source. From the Wizard, select Ecore ODA Data Source on the first page.
Select a new Ecore Data Source.

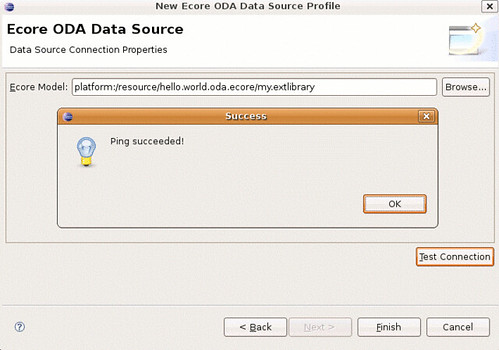
On the second page, select the sample .extlibrary file in your workspace and "Ping" it to make sure that it can be loaded.
Select and test the sample file.

Data Set


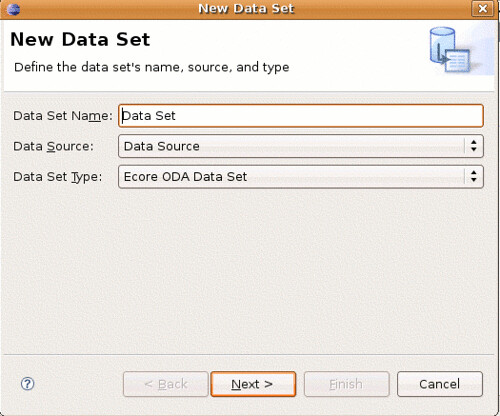
Again in the Data Explorer View, specify a new Data Set. The Data Source that we just created should be automatically selected on the first page of the Wizard, and the Wizard should know that the Data Set Type is Ecore ODA Data Set.
Select the Ecore Data Source we just created.

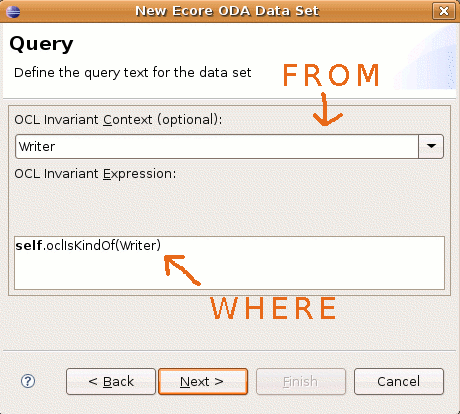
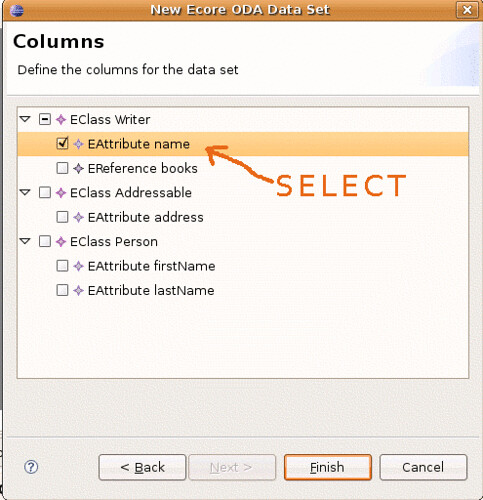
On the next two pages, we will choose the Model Object that we are querying from, the columns that we are selecting to use for the query result, and we will fill in the OCL Condition that will restrict the query results.
A very simple query would be to find the names of all writers in all libraries. For this, we will
select Writer -> name,
from the invariant Writer,
where self.oclIsKindOf(Writer)

Add the OCL Conditional Query and select an Invariant.
If you do not select an invariant from the combo, then all EAttributes and EReferences in the Model will be available for selection. Try it out!

Select the Columns for the Report.
The EAttributes and EReferences displayed are based on the invariant selection on the previous Wizard page. Here, a Writer is also an Addressable Person, so the EStructuralFeatures for those model elements are also available.


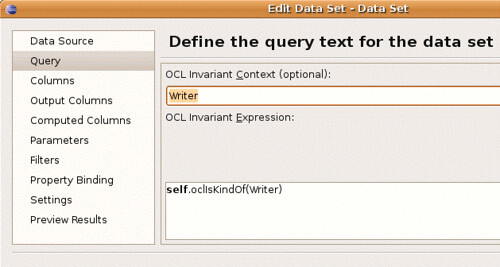
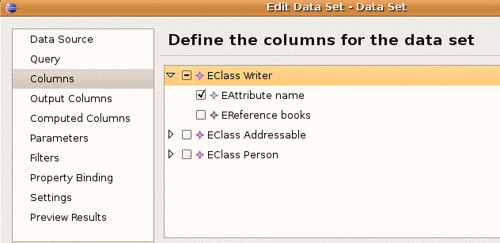
After we are finished with the Wizard, we can Edit the Data Set properties, preview the results of the query, and modify our query conditional, selected columns and invariant.
Edit the Invariant and Query condition.
Edit the Invariant and the conditional query.

Edit the Columns for reporting.
Edit the columns that will appear in the report.

Preview the Query Results.
Preview the query results. You can switch among the pages, so preview different conditional queries, different invariants and different column selections if you feel adventurous!

Run a Report


Now that we have a Data Set, we can drag it into our report to add all the column data (in this case, there is just one column name). From the Preview subtab, we can then preview the report and see our query results!
Drag the Data Set into the report to set up the result set table.

Backport


A backport of these plug-ins for Eclipse 3.2, JDK 1.4 and EMF 2.2 is also available, but future support is not guaranteed. A description of these plug-ins and a comparison between the latest version and the backport is available here.

Part Two


Continue to part 2 of this guide for more advanced features ->