Saturday, December 29, 2007

Packaging a JMock Plugin for Eclipse

I have not seen a standard JMock plug-in for Eclipse (I did not search too closely). In any case, this entry will provide a demonstration for one way to use 3rd-party libraries in your own Eclipse project. Keep in mind that the licensing and distribution of 3rd-party libraries is a different matter entirely (but if anyone out there has any information on it, I would certainly be interested in learning).

Download the JMock library


The latest stable release of JMock is 2.4.0 and can be downloaded here, or in a unix shell with
  • wget http://www.jmock.org/dist/jmock-2.4.0-jars.zip
We will also need to unzip jmock-2.4.0-jars.zip to access the jars.
I am not particularly fond of the way the source and binaries are packed together in some of these libraries. My preference would be to isolate the functional code from the IDE resources (IDE usage appears to be the motivation for the current packaging scheme).

I also like to have the JMock javadocs on hand and we can download them here or in a shell
  • wget http://www.jmock.org/dist/jmock-2.4.0-javadoc.zip

Decide How to Package the Library


I have seen various ways to package 3rd-party libraries in Eclipse plug-ins, and the final word on packaging a library generally comes from the owner. Until jmock.org provides an Eclipse distribution, whatever method we choose will be fine, but it is in no way the authoritative means of distribution.


Embedded as a Jar in a plug-in with custom code

3rd-party libraries in the same plug-in as custom code is not good form.


While this might be fine for very small projects, I would caution against it. There is always a chance that the library owner will create a standard Eclipse plug-in someday, or that someone else will produce an Eclipse plug-in for a functionally equivalent (or better) library, so it is a good idea to keep our code separate from their code.


Unwrapped binary or source plug-in

Unpacked 3rd-party libraries in a separate plug-in.


Unless we were planning to modify code in the 3rd-party library (in which case we would be forking the distribution and assuming responsibility for the modified code) there is really no need to unpack the archive. Why should our automated build process spend cycles re-compiling unchanging library source code or re-packing standard binaries? I am confident that library jars inside plug-ins incur little to no performance penalty over plug-in jars with unwrapped binaries (unfortunately, I do not recall where I originally read that and would like to provide a cited reference).


Plug-in containing multiple jars

Multiple packed 3rd-party libraries in a separate plug-in.


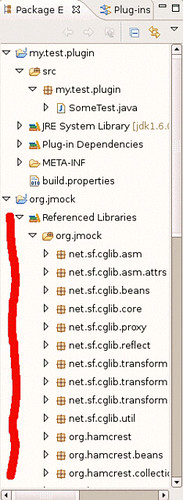
This will probably satisfy our requirements. Since the JMock libraries and their dependencies are distributed as a single unit, I feel comfortable putting them all inside a single plug-in and exposing only the top-level org.jmock packages (along with org.hamcrest packages as needed). The PDE provides a good way to manage dependencies among version-ranges of libraries. Because JMock is already provided as a distribution with a single, downloadable file that contains specifically-versioned dependencies, that management is already handled for us (it just happens that the version range is restricted to a single value per library).


Plug-in per jar

One 3rd-party library per plug-in.


This would be ideal, but, as consumers of the libraries and not as the actual distributors, it should not be up to us to manage declaration of the interdependencies of the libraries and the fine-grained packaging and versioning of these plug-ins for Eclipse. Individual plug-ins probably would not benefit us much over the multi-jar plug-in approach, especially if we plan to upgrade the JMock distribution as new versions become available, and this approach may even add unwanted maintainance costs for re-packaging the libraries into 8 plug-ins, as opposed to 1 plug-in, every few months.


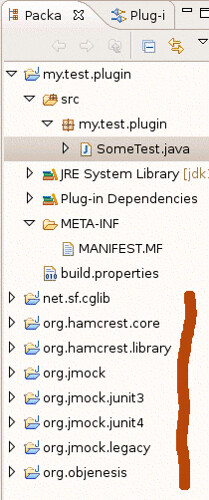
Create a new Eclipse Plug-in Project


Now that we have decided to package the JMock distribution as a single plug-in, the creation of the plug-in project itself is very straightforward with the New Project Wizard.

The New Project Wizard handles most of what we need.

New -> Project... -> Plug-in Development -> Plug-in From existing JAR archives

Add the JARs that came with the JMock download.

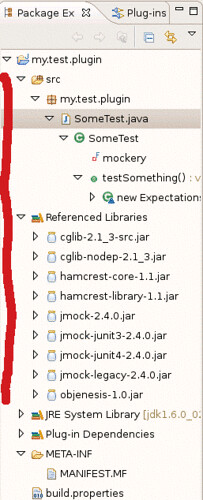
Select all the JMock JARs that were unzipped from the downloaded archive. If you had originally put these JARs inside a plug-in with your test code and are now moving them into their own plug-in, then you can Add... the JARs from your Workspace. Since we have the JARs stored in some other location on the filesystem, we will Add External....

Choose a name and version for the plug-in and don't forget to un-check the Unzip option!

The final word on the naming and versioning of a plug-in, much as the physical packaging, comes from the owner of the library. If we were planning to modify the JMock source code, then we would probably use the same naming convention that we use for our other plug-in projects, for example we would call our fork of JMock my.company.jmock. Since we are planning to consume JMock as-is, then we will want to give the plug-in a more conventional name, such as org.jmock. Similarly, since we will not modify the libraries, we can follow the current jmock versioning scheme and say that the plug-in has a version of 2.4.0.
By default, the Wizard checks the Unzip the JAR archives into the project option; here we want to uncheck that option.


I prefer to restrict the packages that are exported just to what I will access.
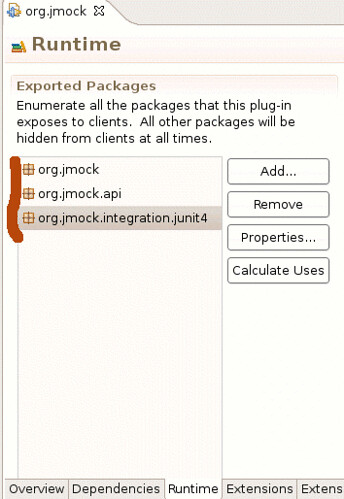
By default, the Wizard will automatically export all available Java packages for the plug-in. My preference is to export only those packages that I will access from my test code. To get started, the list includes org.jmock, org.jmock.api and org.jmock.integration.junit4. As we write more tests, we might need some custom matchers that are available in org.hamcrest.Matchers but are not exposed by JMock.

Get JUnit 4.4


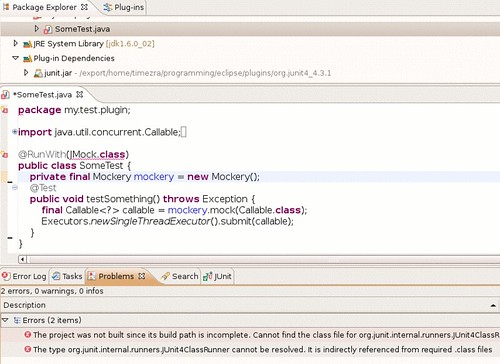
Unfortunately, just as with Spring 2.5 JUnit support, JMock has a dependency on JUnit 4.4, but JUnit 4.3 is bundled with Eclipse. If we were to try to use the JMock.class runner in a JUnit 4 test case, we would see the following compilation error:
  • The type org.junit.internal.runners.JUnit4ClassRunner cannot be resolved. It is indirectly referenced from required .class files
Compilation exception because JMock requires JUnit 4.4.

Since JMock depends on JUnit 4.4, and since we are bundling JMock and its dependencies as a single plug-in, should the JUnit 4.4 jar be included in the same plug-in even though it is not part of the downloadable distribution on jmock.org?  I do not know an absolute right answer.
We can get the JUnit 4.4 jar from here or download it from a unix shell with
  • wget http://downloads.sourceforge.net/junit/junit-4.4.jar?modtime=1184865382&big_mirror=0
We can import the junit-4.4.jar into our org.jmock plug-in with the Import... -> File System Wizard.

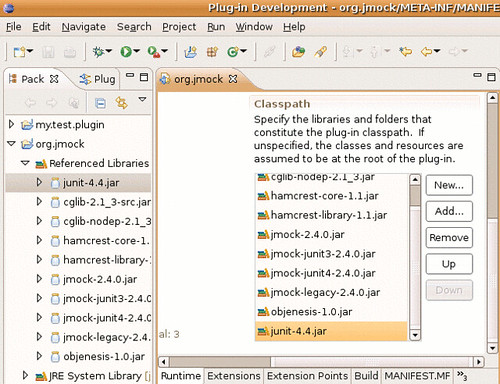
Once the junit4.4.jar is in the workspace, we can add it to the plug-in's classpath in the MANIFEST.MF.

Add Junit4.4 to the plug-in's classpath.

Write a JMock Test Case


The JMock Cookbook is a great resource for getting started with JMock. Our goal is to get a single test-case running with a mock object to verify our plug-in configuration.
We can declare our dependency on org.jmock in our test plug-in's MANIFEST.MF. We want to ensure that org.jmock is declared as a dependency before org.junit4.
Declare org.jmock before org.junit4 dependency.


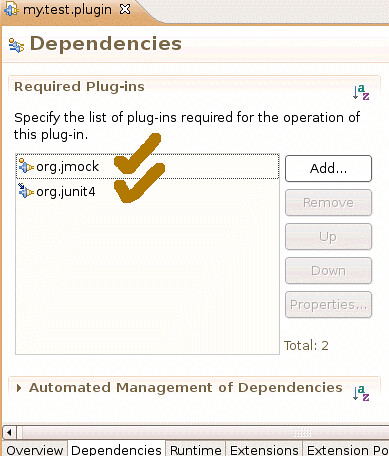
I have seen the following initialization error from the JMock test runner if org.junit4 is declared first (presumably because JMock is using JUnit 4.4 and Eclipse is using 4.3)
Failure trace when org.junit4 dependency is declared before org.jmock dependency.

We can create a new test case that uses a Mock Object and the JMock test runner. The following code should be enough:

package my.test.plugin;

import java.util.concurrent.Callable;
import java.util.concurrent.Executors;
import org.jmock.Mockery;
import org.jmock.integration.junit4.JMock;
import org.junit.Test;
import org.junit.runner.RunWith;

@RunWith(JMock.class)
public class SomeTest {
private final Mockery mockery = new Mockery();

@Test
public void testSomething() throws Exception {
final Callable<?> callable = mockery.mock(Callable.class);
Executors.newSingleThreadExecutor().submit(callable).get();
}
}

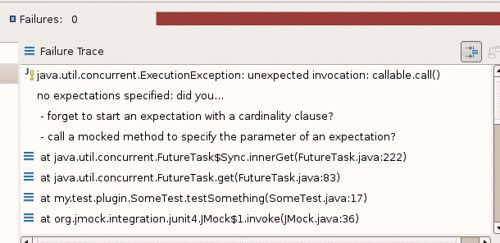
We should now see a legitimate test failure! We expect that the Executor will call Callable#get, and from the JMock failure trace, that is exactly what happened.

We are expecting our test case to fail.

Now let's emend our test code so that the mock object expects an invokation of Callable#call.

package my.test.plugin;

import org.jmock.Expectations;
....

@Test
public void testSomething() throws Exception {
final Callable<?> callable = mockery.mock(Callable.class);
mockery.checking(new Expectations() {
{
one(callable).call();
}
});
Executors.newSingleThreadExecutor().submit(callable).get();
}
}


We have a green bar!
We are expecting our test case to fail.

It appears that we have successfully incorporated the JMock 3rd-party libraries into a re-usable Eclipse plug-in.

Wednesday, December 26, 2007

An EMF Editor for VoiceXML

The following entry provides a starting point for creating a basic EMF editor for VoiceXML. It is actually very straightforward and provides a good demonstration of the power of EMF for creating a basic, yet powerful editor (with cut-and-paste, drag-and-drop, syntax checking, etc.) for a language with an existing, well-defined schema. My goal here is not to provide a polished, finished editor, but a fully-functional starting point.

Download the VoiceXML Shemas from the W3C website


The VoiceXML schemas can all be downloaded from http://www.w3.org/TR/voicexml21
We will need the following 9 files:
  • vxml.xsd
  • vxml-attribs.xsd
  • vxml-datatypes.xsd
  • vxml-grammar-extension.xsd
  • vxml-grammar-restriction.xsd
  • vxml-synthesis-extension.xsd
  • vxml-synthesis-restriction.xsd
  • grammar-core.xsd
  • synthesis-core.xsd

From a unix shell, you can use the following command to retrieve these files:

wget http://www.w3.org/TR/voicexml21/vxml.xsd \
http://www.w3.org/TR/voicexml21/vxml-attribs.xsd \
http://www.w3.org/TR/voicexml21/vxml-datatypes.xsd \
http://www.w3.org/TR/voicexml21/vxml-grammar-extension.xsd \
http://www.w3.org/TR/voicexml21/vxml-grammar-restriction.xsd \
http://www.w3.org/TR/voicexml21/vxml-synthesis-extension.xsd \
http://www.w3.org/TR/voicexml21/vxml-synthesis-restriction.xsd \
http://www.w3.org/TR/voicexml21/grammar-core.xsd \
http://www.w3.org/TR/voicexml21/synthesis-core.xsd


Modify the VoiceXML Schemas


Unfortunately, the schemas cannot currently be converted directly into Ecore files, but the modifications you will need to make are minor.

In the vxml-attribs.xsd file, remove the import declaration for xml.xsd, or else we may see the following warning:
Warning | XSD: The location 'http://www.w3.org/2001/xml.xsd' has not been resolved | vxml-attribs.xsd | line 23
We can remove the declaration from the file in a shell with these commands:
  • perl -pi -e 's~<xsd:import namespace="http://www.w3.org/XML/1998/namespace"~~' vxml-attribs.xsd
  • perl -pi -e 's~schemaLocation="http://www.w3.org/2001/xml.xsd"/>~~' vxml-attribs.xsd

In the vxml-synthesis-extension.xsd, add an import declaration for vxml.xsd, or else we may see the following error:
Error | XSD: Model group reference 'http://www.w3.org/2001/vxml#executable.content is unresolved | vxml-synthesis-extension.xsd | line 93
We can add this declaration in a shell with this command:
  • perl -pi -e 's~<xsd:include schemaLocation="vxml-attribs.xsd"/>~<xsd:include schemaLocation="vxml-attribs.xsd"/>\n <xsd:include schemaLocation="vxml.xsd"/>~' vxml-synthesis-extension.xsd

Remove the redefinition of speak.attribs in vxml-synthesis-restriction.xsd and hard-code the restriction in synthesis-core.xsd, or else we may see the following error:
Error | XSD: The type of attribute '#version' must derive from '#version.datatype' | vxml-synthesis-restriction.xsd | line 34
We can hard-code this redefinition in a shell with these commands:
  • perl -pi -e 's~<xsd:attributeGroup name="speak.attribs">~~' vxml-synthesis-restriction.xsd
  • perl -pi -e 's~<xsd:attribute name="version" type="version.datatype" fixed="1.0"/>~~' vxml-synthesis-restriction.xsd
  • perl -pi -e 's~<xsd:attribute ref="xml:lang"/>~~' vxml-synthesis-restriction.xsd
  • perl -pi -e 's~<xsd:attribute ref="xml:base"/>~~' vxml-synthesis-restriction.xsd
  • perl -pi -e 's~</xsd:attributeGroup>~~' vxml-synthesis-restriction.xsd
  • perl -pi -e 's~<xsd:attribute name="version" type="version.datatype"/>~<xsd:attribute name="version" type="version.datatype" fixed="1.0"/>~' synthesis-core.xsd

In the vxml-synthesis-restriction.xsd file, remove the import declaration for xml.xsd, or else we may see the following warning:
Warning | XSD: The location 'http://www.w3.org/2001/xml.xsd' has not been resolved | vxml-synthesis-restriction.xsd | line 21
We can remove the declaration from the file in a shell with these commands:
  • perl -pi -e 's~<xsd:import namespace="http://www.w3.org/XML/1998/namespace"~~' vxml-synthesis-restriction.xsd
  • perl -pi -e 's~schemaLocation="http://www.w3.org/2001/xml.xsd"/>~~' vxml-synthesis-restriction.xsd

Replace the xsd:union references in synthesis-core.xsd with the regex restrictions for the unioned datatypes, or else we may see the following when trying to create an EMF project from the schemas:
Error: XSD: The 'memberTypes' attribute must be present or tehre must be contained member types : URI null Line 155 Column 2
Error: XSD: The 'memberTypes' attribute must be present or tehre must be contained member types : URI null Line 159 Column 2
Error: XSD: The 'memberTypes' attribute must be present or tehre must be contained member types : URI null Line 163 Column 2
Error: XSD: The 'memberTypes' attribute must be present or tehre must be contained member types : URI null Line 167 Column 2
Error: XSD: The value '100.0' of attribute 'default' must be one of the members types of 'http://www.w3.org/2001/vxml#volume.datatype' : URI null Line 365 Column 4
We can replace the xsd:union references in synthesis-core.xsd in a unix shell with the following commands:
  • perl -pi -e 's~<xsd:union memberTypes="hertz.number hertz.relative percent semitone height.scale"/>~<xsd:restriction base="xsd:string">\n <xsd:pattern value="(([0-9]+|[0-9]+.[0-9]*|[0-9]*.[0-9]+)Hz)|([+\-]([0-9]+|[0-9]+.[0-9]*|[0-9]*.[0-9]+)Hz)|([+\-]?([0-9]+|[0-9]+.[0-9]*|[0-9]*.[0-9]+)%)|([+\-]([0-9]+|[0-9]+.[0-9]*|[0-9]*.[0-9]+)st)|(x-high|high|medium|low|x-low-default)" />\n </xsd:restriction>~' synthesis-core.xsd
  • perl -pi -e 's~<xsd:union memberTypes="number percent speed.scale"/>~<xsd:restriction base="xsd:string">\n <xsd:pattern value="([0-9]+|[0-9]+.[0-9]*|[0-9]*.[0-9]+)|([+\-]?([0-9]+|[0-9]+.[0-9]*|[0-9]*.[0-9]+)%)|(x-fast|fast|medium|slow|x-slow|default)" />\n </xsd:restriction>~' synthesis-core.xsd
  • perl -pi -e 's~<xsd:union memberTypes="volume.number relative percent volume.scale"/>~<xsd:restriction base="xsd:string">\n <xsd:pattern value="(0*(100.[0-9]*|[0-9][0-9].[0-9]*|[0-9].[0-9]*|.[0-9]+))|([+\-]([0-9]+|[0-9]+.[0-9]*|[0-9]*.[0-9]+))|([+\-]?([0-9]+|[0-9]+.[0-9]*|[0-9]*.[0-9]+)%)|(silent|x-soft|soft|medium|loud|x-loud|default)" />\n </xsd:restriction>~' synthesis-core.xsd


Create an EMF Project From the VoiceXML Schemas


We will need to install 2 plugin-projects in order to generate the EMF model and editor from the VoiceXML schemas:
Eclipse Modelling Framework (EMF) SDK
XML Schema Infoset Model (XSD) Extender SDK

We can install these through the Europa Discovery Site by following this path of menu options:
Help -> Software Updates -> Find and Install... -> Search For New Features To Install -> Europa Discovery Site -> Models and Model Development -> EMF Extender SDK and XSD Extender SDK
EMF Extender SDK and XSD Extender SDK

Now, we are ready to create the EMF Project with a standard menu: File -> New -> Project... -> EMF Project.
We can call the project org.w3.vxml.
Create the EMF Project in the New Project Wizard

We will select the XML model importer from the New Project Wizard.
Select the XML model importer from the New Project Wizard

We can select the nine schemas listed above for generating the genmodel file, which we will call vxml.genmodel.
Select the nine schemas listed above for generating the genmodel file

We can select to generate the packages org.w3._2001.vxml and org.w3.xml._1998.namespace (since the vxml package depends on the xml package).
Generate org.w3._2001.vxml and org.w3.xml._1998.namespace


Modify the Generated Ecore and Genmodel


This step is open-ended, as modifications to the ecore and genmodel files will be as needed, depending on how our target audience will use the editor. Here are a few quick cosmetic changes:
  • In the ecore file, remove any Type suffixes from the model objects (e.g., change AssignType -> Assign, BlockType -> Block, etc.). Unfortunately, since there are both a Meta and MetaType and Metadata and MetadataType elements in the ecore file, these names cannot be changed. Also, if we try to change ObjectType to Object, we will get errors in the generated code.
  • In the ecore file, change Audio -> BaseAudio and Audio1 -> Audio since Audio1 and not Audio is the element that is primarily used. Do the same for Mark and Mark1, SayAs and SayAs1, VersionDatatype and VersionDatatype1, and MixedGrammar, MixedGrammar1 and MixedGrammar11.
  • In the genmodel file, change the Namespace Base Package from org.w3.xml._1998 to org.w3.xml. Likewise, change the VXML Base Package from org.w3._2001 to org.w3.vxml.


Generate the Model, Edit and Editor Code


From the root Vxml Node in the genmodel file, generate the Model code, then the Edit code and then the Editor code. Just like that, the Model Objects, the ItemProviders for displaying the Model in the UI and the multi-tab Editor code has all been generated. So let's try it out!
Generate the model, edit and editor code.

Start Coding VoiceXML


On the Overview page of the /org.w3.vxml.editor/META-INF/MANIFEST.MF form editor, in the Testing section, we will click on Launch an Eclipse application.
In the new Workbench, we will create a New General project and call it hello.world.vxml.
Now, from the New -> Other... wizard, we will create a new Vxml Model (Under Example EMF Creation Wizards) and call it HelloWorld.vxml.
Create a new Vxml Model.

We will select Vxml as the Model Object and Finish the Wizard.
Use Vxml as the Model Object.

In the Editor that is now opened, we can start writing Vxml!
Hello World Vxml in the generated editor.

We can view the emitted VoiceXML with the Text editor.
The emitted Hello World Vxml code.

Tuesday, December 18, 2007

Dynamic Labels for Eclipse Context Menus

The following entry describes a simple way to contribute context menu commands with dynamic labels to an Eclipse view. In my first attempt, I tried to use state to modify the command label but could not get it to work. Instead, I used dynamic commands because the approach was easier to figure out and implement, and the amount of code involved was so small that even if the approach is not ideal, it seems robust and scalable.
You will need rudimentary experience with Eclipse plug-in development to find this post valuable.

Create an Eclipse Plug-in Project


For this example, we do not need anything fancy, just the most basic Eclipse plug-in (File -> New -> Project... -> Plug-in Project). I called my project my.project.
Create a new project.

Declare a Menu Extension


We will declare that we are contributing a menu item in the plugin.xml. To access the menu extension point, we need to declare a plugi-in dependency on org.eclipse.ui. The extension point we are using is org.eclipse.ui.menus.
Add the org.eclipse.ui.menus extension.

Note: we could use the "Hello, World" command contribution as a starting point, but I prefer the agglutinative to the reductive approach as a starting point.

Add a Menu Contribution


Add a menuContribution for the org.eclipse.ui.menus extension.
Set its locationURI to popup:org.eclipse.ui.popup.any?after=additions.
The scheme popup indicates that the menuContibution should appear for context menus. Other valid values are menu and toolbar.
The menu ID org.eclipse.ui.popup.any is a magic string that explains itself. If you would prefer to use resrict the popup contribution to a specific editor or view, then use its unique ID.
The query after=additions indicates that the contribution should appear after the standard IWorkbenchActionConstants.MB_ADDITIONS group. As you might guess, the placement value after might just as well be before.

Create a Dynamic Menu Contribution Node


Add a dynamic node to the menuContribution. Here we will declare the org.eclipse.ui.actions.CompoundContributionItem that will create the dynamic menu entries. For this example, I have declared the ID as my.project.myCompoundContributionItem and the class as my.project.MyCompoundContributionItem.
Add a menuContribution to the org.eclipse.ui.menus extension and a dynamic node to the menuContribution.

Create a CompoundContributionItem


Let Eclipse create my.project.MyCompoundContributionItem.java for you and set a Debug breakpoint in the getContributionItems method. We can set the ID as my.project.myCompoundContributionItem and the class as my.project.MyCompoundContributionItem.

Side-note: Debug The Menu Contribution


From the plug-in Overview page, in the Testing category, we can launch another Eclipse runtime in debug mode and trace when the getContributionItems method is called. Just set a breakpoint inside the method body, and, when the new Eclipse workbench starts, right-click anywhere in the project explorer. We have configured the dynamic menuContribution to contribute an empty array of IContributionItem to all popup menus. It's not particularly useful, but it's a start.
A trace of the getContributionItems menu being called.

Declare a Command Extension


Now that we have declared an org.eclipse.ui.menus extension and added a menuContribution with dynamic content, it should be straightforward for us to declare an org.eclipse.ui.commands extension, with two nodes: one for the category, which is the group in the context menu where our commands will appear, and one for the command declaration.
I have assigned to the category the id my.project.myCategory and name My Category and to the command the id my.project.myCommand, name Do Something and categoryId my.project.myCategory.
The org.eclipse.ui.commands with nodes for a command and for a menu group.

Declare a Command Handler


Now that we have an org.eclipse.ui.commands extension, we will add a handler for this command. We just need to declare an org.eclipse.ui.handlers extension with a new handler node and the commandId declared above, my.project.myCommand.
Three declared extensions are used for adding a context menu command with a dynamic label.
We can create a new AbstractHandler implementation, called my.project.MyHandler that looks something like this:

package my.project;

import org.eclipse.core.commands.AbstractHandler;
import org.eclipse.core.commands.ExecutionEvent;
import org.eclipse.core.commands.ExecutionException;
import org.eclipse.jface.dialogs.MessageDialog;
import org.eclipse.ui.handlers.HandlerUtil;

public class MyHandler extends AbstractHandler {
@Override
public Object execute(ExecutionEvent event) throws ExecutionException {
MessageDialog.openInformation(
HandlerUtil.getActiveShellChecked(event), "My Handler",
"Not yet implemented");
return null;
}
}


Add a Simple CommandContributionItem


We are now going back to the MyCompoundContributionItem class to return a CommandContributionItem for the command extension above.
You may need to declare a dependency on org.eclipse.core.runtime to get a code completion for the the PlatformUI#getWorkbench method, which returns an IWorkbench. The active workbench window will suffice as our IServiceLocator. Notice in the implementation below that the label counter (the 4th Constructor parameter from the end for the CommandContributionItem) will be incremented every time a new context menu is opened. This should satisfy our simple requirement for dynamically updating the context menu label.
Similarly, we can dynamically update the icon, tooltip, etc., based on the state of the application (current selection, current perspective, etc.).

package my.project;

import java.util.Collections;

import org.eclipse.jface.action.IContributionItem;
import org.eclipse.swt.SWT;
import org.eclipse.ui.PlatformUI;
import org.eclipse.ui.actions.CompoundContributionItem;
import org.eclipse.ui.menus.CommandContributionItem;


public class MyCompoundContributionItem extends CompoundContributionItem {
private static int counter = 0;
protected IContributionItem[] getContributionItems() {
return new IContributionItem[] {
new CommandContributionItem(PlatformUI.getWorkbench().getActiveWorkbenchWindow(),
"my.project.myCommandContributionItem", "my.project.myCommand",
Collections.emptyMap(), null, null, null,
"Dynamic Menu "+ counter++, null, null, SWT.NONE)
};
}
}

Now we can Launch the Eclipse Application from the Testing section of the Overview tab, right-click a few times and watch as the menu label is updated every time a new context menu pops up!
The dynamic label is updated every time we right-click to open a context menu.


Note: as of Ganymede (Eclipse 3.4), the above constructor for CommandContributionItem has been deprecated. For an example of the class MyCompoundContributionItem for use in Eclipse 3.4, look here.

Monday, December 17, 2007

Nexenta and the Eclipse Debugger

A few nights ago, when I tried to start the Eclipse debugger on Nexenta, I received the following error:

UTF ERROR ["../../../src/solaris/npt/utf_md.c":49]: Failed to complete iconv_open() setup

This seems to be similar to the known Nexenta javaws bug and to a Nexenta Netbeans debugger problem.

Thanks very much to Jeff Moguillansky for helping me to get up and running with this! I replaced my /usr/lib/iconv with the non-open-source files, as he suggested, and was soon running a new Eclipse instance in debug mode.

Wednesday, November 14, 2007

Building Ruby From Source On Nexenta

Currently Nexenta's package manager provides installations of Ruby 1.8.2 (the ruby package) and Ruby 1.8.4 (the ruby1.8 package). If you would like to build the latest version (1.8.6 as of this writing), these are instructions for the steps that I took beyond what is currently posted on the rubyonrails website. Keep in mind that your custom installation will not be available for update with the Synaptic package manager and may cause conflicts if you choose to install the version from the Nexenta repository, so you might want to consider overriding the default installation directory (in the directions, I specify --prefix=/usr/opt in the ruby_zone, but for the global zone, I tend to use $HOME as my installation path for non-Synaptic installations).

Install a Ruby on Rails Zone

Install a new zone called ruby_zone and login.

Build and Install Ruby From Source

  • root@ruby_zone:~# mkdir /usr/opt/sources
  • root@ruby_zone:~# cd /usr/opt/sources/
  • root@ruby_zone:/usr/opt/sources# wget http://ftp.ruby-lang.org/pub/ruby/1.8/ruby-1.8.6.tar.gz
  • root@ruby_zone:/usr/opt/sources# gunzip ruby-1.8.6.tar.gz
  • root@ruby_zone:/usr/opt/sources# tar -xf ruby-1.8.6.tar
  • root@ruby_zone:/usr/opt/sources# cd ruby-1.8.6
  • root@ruby_zone:/usr/opt/sources/ruby-1.8.6# apt-get install make gcc
  • root@ruby_zone:/usr/opt/sources/ruby-1.8.6# apt-get install zlib1g-dev (or else you will see an error that looks like remote_fetcher.rb:4:in `require': no such file to load -- zlib (LoadError) error when installing ruby gems)
  • root@ruby_zone:/usr/opt/sources/ruby-1.8.6# ./configure --prefix=/usr/opt --with-zlib-include=/usr/include --with-zlib-lib=/usr/lib
  • root@ruby_zone:/usr/opt/sources/ruby-1.8.6# make
  • root@ruby_zone:/usr/opt/sources/ruby-1.8.6# make test (expect to see a test succeeded message)
  • root@ruby_zone:/usr/opt/sources/ruby-1.8.6# make install

Setup Ruby Gems

  • root@ruby_zone:/usr/opt/sources/ruby-1.8.6# cd ..
  • root@ruby_zone:/usr/opt/sources# wget http://rubyforge.org/frs/download.php/20989/rubygems-0.9.4.tgz
  • root@ruby_zone:/usr/opt/sources# gunzip rubygems-0.9.4.tgz
  • root@ruby_zone:/usr/opt/sources# tar -xf rubygems-0.9.4.tar
  • root@ruby_zone:/usr/opt/sources# cd rubygems-0.9.4
  • root@ruby_zone:/usr/opt/sources/rubygems-0.9.4# /usr/opt/bin/ruby setup.rb
  • root@ruby_zone:/usr/opt/sources/rubygems-0.9.4# /usr/opt/bin/gem update (or else you may see Could not find rails (> 0) in any repository)

Install the Rails Gem

  • root@ruby_zone:/usr/opt/sources/rubygems-0.9.4# /usr/opt/bin/gem install rails --include-dependencies
  • root@ruby_zone:/usr/opt/sources/rubygems-0.9.4# mkdir /tmp/test_rails
  • root@ruby_zone:/usr/opt/sources/rubygems-0.9.4# /usr/opt/bin/rails /tmp/test_rails
  • root@ruby_zone:/usr/opt/sources/rubygems-0.9.4# cd /tmp/test_rails
  • root@ruby_zone:/tmp/test_rails# /usr/opt/bin/ruby script/server (expect WEBrick to start)

From a browser, open http://ipaddress.of.ruby_zone:3000 (I chose 192.168.0.115 as the ipaddress)

You should now see the Rails "Welcome aboard" screen!

Saturday, November 10, 2007

Unix Command To Delete Corrupted Subversion Meta-data

Did you ever find yourself in a situation where you have projects checked-out from source control and the directory-based source control meta-data (from CVS or Subversion) has somehow become irreparably corrupted (or the fix to the corruption is non-obvious)? You do not want to lose local working-copy changes, but because of the corruption you cannot rebuild the meta-data, re-connect to source control, or overlay freshly-updated project files from the source control system without the potential loss of your local workspace changes?
A solution to this problem is to delete only the project's meta-data directories, back-up the project files to a temporary directory, re-check out the project code from the source control system, and overlay the backed-up project files onto the pristine project (which has uncorrupted meta-data).

This is the simple Unix command I use for deleting all the Subversion meta-data in a directory and in its subdirectories:

  • find . -name .svn -type d -print | xargs rm -r -f

It is pretty straightforward to interpret what is happening with this command. It is finding any directory (-type d) named .svn in the current directory (.) and its subdirectories. Each of those directories is deleted (rm -r) without prompting (-f). -print | xargs can be interpretted as use each result from the find command as input to the rm command.

find is very robust in what it can take as input, so a more general version of this line could be rewritten as:

  • find </path/to/a/directory> -name <a_regex> -type <d | f> -print | xargs rm -r -f

It can then be used to delete from a branch of the filesystem heirarchy any files or directories whose names match some pattern.

Friday, October 26, 2007

Installing Pidgin For Nexenta

In order to work out these instructions I originally built Pidgin in its own zone, called the pidgin_zone. Since Pidgin requires the X Server graphics libraries, I have installed it in the global zone locally. For any installations that are not officially supported by the Nexenta package manager, I never use the default installation path or any installation path that requires root access. I generally use my $HOME directory as the installation path. This has worked so far when I have installed Opera, for example, and it worked for the Pidgin install, as well. Please keep in mind that since Nexenta's package manager does not have a record of these types of installations, you will be required to upgrade on your own without Synaptic's help.

Step 1: Install Nexenta Libraries

You will need the following packages for extracting and building the Pidgin source:
  • timezra@nexentaos:~# sudo apt-get install bzip2
  • timezra@nexentaos:~# sudo apt-get install libgnomeui-dev
  • timezra@nexentaos:~# sudo apt-get install make
  • timezra@nexentaos:~# sudo apt-get install gcc
The list of libraries that the Pidgin source depends on was originally taken from this post.
  • timezra@nexentaos:~# sudo apt-get install libxml-parser-perl (or else you will see the error "checking for XML::Parser... configure: error: XML::Parser perl module is required for intltool" when you run ./configure)
  • timezra@nexentaos:~# sudo apt-get install libxml2-dev gettext libnss-dev libnspr-dev libgtkspell-dev

Step 2: Build Pidgin From Source

After the Nexenta dependencies are installed, unzipping, building and installing the libraries should be easy.
  • timezra@nexentaos:~# mkdir $HOME/build
  • Download and copy pidgin-2.2.2.tar.bz2 to $HOME/build
  • timezra@nexentaos:~# cd $HOME/build
  • timezra@nexentaos:~/build# bunzip2 pidgin-2.2.2.tar.bz2
  • timezra@nexentaos:~/build# tar -xf pidgin-2.2.2.tar
  • timezra@nexentaos:~/build# cd pidgin-2.2.2
  • timezra@nexentaos:~/build/pidgin-2.2.2# ./configure --prefix=$HOME
  • timezra@nexentaos:~/build/pidgin-2.2.2# make
  • timezra@nexentaos:~/build/pidgin-2.2.2# make check
  • timezra@nexentaos:~/build/pidgin-2.2.2# make install
You should now have an executable file $HOME/bin/pidgin that will start the IM client!

Step 3: Copy Pidgin Accounts From One Computer To Another

Originally, I had been running Pidgin on my Windows laptop at work, but when I left that job, I had to turn over the computer to IT. I have collected some 6 or 7 IM accounts over the years and I hate to keep track of them. Previously, I had used Trillian to manage my accounts but switched to Pidgin when I registered with gmail (since, at the time, only the for-pay version of Trillian supported Google chat). I did not want to re-create all those accounts for my home install of Pidgin, but I could not find an easy way from inside Pidgin to export the registration / group data. After a quick search, in a local directory of Windows (I believe it was My Documents/Application Data), I stumbled onto a directory called .purple. I copied the resources icons, smileys, accels, accounts.xml, blist.xml, pounces.xml, prefs.xml and status.xml off the Windows machine.
After installing Pidgin into my $HOME directory on Nexenta, I noticed the new directory $HOME/.purple. I copied the contents that I had taken off the Windows machine to this directory, and Voila! It was just that easy to connect to all my IM accounts again and my contacts were properly arranged in all their appropriate folders.

Unix Command to Find And Replace Text in a File

The following is a very simple, one-line command for finding and replacing all instances of a text pattern in a file (or files). There are numerous sources for this short script. It may seem completely trivial, but it comes in handy.
  • perl -pi -e 's/<find>/<replace>/' FILE_1 FILE_2 ... FILE_n

This will only replace the first occurrence of the pattern per line. If you want to replace all occurrences in every line, then add the 'g' option, like this.
  • perl -pi -e 's/<find>/<replace>/g' FILE_1 FILE_2 ... FILE_n

If you want the find to be case-insensitive, then use the 'i' option, like this.
  • perl -pi -e 's/<find>/<replace>/i' FILE_1 FILE_2 ... FILE_n

If you find that you need to replace file path names in text, then instead of back-slashing all the path separators in your pattern, you might want to choose a different s/// separator. I have found that '~' works pretty well (but if your paths contain '~'s, then you should experiment).
  • perl -pi -e 's~/path/to/my/file~/new/path/to/file~' FILE_1 FILE_2 ... FILE_n

If you want to replace some text with the contents of an environment variable, then you can access the environment with the hash ENV.

  • perl -pi -e 's~some_text~$ENV{environment_variable}~' FILE_1 FILE_2 ... FILE_n

Tuesday, October 23, 2007

Installing Luntbuild With Tomcat For Nexenta

Luntbuild is a continuous integration server and build management tool. I have chosen to use it because it has been so easy to set up builds with it in the past. Their claim that it takes about 1/2 hour to set up an initial build was pretty accurate when I used it before on a Windows machine. I wanted to test out this claim for Nexenta. Since Nexenta already offers a Tomcat 5 package, I thought the initial set-up would be a piece of cake. It became a good learning experience about Java security policies.
The security permissions required for running web applications with the Nexenta Tomcat package provided a big headache for me, as I have not configured Tomcat policy files before, and Terracotta and Spring (which Luntbuild uses) seem to use quite a few restricted actions. Hopefully these instructions will help some other intrepid Agilist who wants to get a CI server up and running quickly on Nexenta or Ubuntu.

Step 1: Create a New Zone


See these instructions for setting up a new zone for Nexenta. I named my zone luntbuild_zone and put it in /export/home/zones/luntbuild_zone.
Do NOT bootstrap tomcat5 with the install as you will need to install the JDK separately before tomcat5.

Step 2: Install JDK 6 in the luntbuild_zone


See these instructions for setting up the JDK in a new base Nexenta zone.
Tomcat requires the JDK, and, unfortunately, Nexenta only provides a JRE package. If you install tomcat5 without a JDK, startup fails with the message

Could not start Tomcat 5 servlet engine because no Java Development Kit
(JDK) was found. Please download and install JDK 1.3 or higher and set
JAVA_HOME in /etc/default/tomcat5 to the JDK's installation directory.

Step 3: Install Tomcat


  • root@luntbuild_zone:~# export JAVA_HOME=/usr/opt/jdk1.6.0_02
  • root@luntbuild_zone:~# apt-get install tomcat5
  • root@luntbuild_zone:~# vi /etc/default/tomcat5
    add the line JAVA_HOME=/usr/opt/jdk1.6.0_02
  • root@luntbuild_zone:/usr/opt# /etc/init.d/tomcat5 start
    Starting Tomcat 5 servlet engine using Java from /usr/opt/jdk1.6.0_02: tomcat5.
  • Navigate to http://192.168.0.111:8180 in a browser and you should see an empty directory listing. This directory corresponds to /var/lib/tomcat5/webapps/ROOT/.

Step 4: Install the Luntbuild Web Application


These instructions come primarily from the Luntbuild Installation Guide in the section Installation using zip distribution (without GUI)

Download the luntbuild 1.5.3 zip (NOT the installer-jar).
  • root@luntbuild_zone:~# mkdir /usr/opt/luntbuild
  • Copy luntbuild-1.5.3.zip into /usr/opt/luntbuild
  • root@luntbuild_zone:~# cd /usr/opt/luntbuild
  • root@luntbuild_zone:/usr/opt/luntbuild# apt-get install unzip
  • root@luntbuild_zone:/usr/opt/luntbuild# unzip luntbuild-1.5.3.zip
  • root@luntbuild_zone:/usr/opt/luntbuild# /etc/init.d/tomcat5 stop
  • root@luntbuild_zone:/usr/opt/luntbuild# vi web/WEB-INF/web.xml
    Replace $INSTALL_PATH with /usr/opt/luntbuild
  • root@luntbuild_zone:/usr/opt/luntbuild# vi /usr/opt/luntbuild/log4j.properties (unfortunately, the Luntbuild configuration uses relative paths for these log4j configuration files so you will see File permission errors in the catalina logs if you try to start tomcat from a directory that is not owned by the tomcat5 process; it's best just to change these relative paths to absolute paths)
    Replace luntbuild_log.html with /usr/opt/luntbuild/logs/luntbuild_log.html
    Replace luntbuild_log.txt with /usr/opt/luntbuild/logs/luntbuild_log.txt
  • root@luntbuild_zone:/usr/opt/luntbuild# vi /usr/opt/luntbuild/web/WEB-INF/classes/log4j.properties
    Replace luntbuild_log.html with /usr/opt/luntbuild/logs/luntbuild_log.html
    Replace luntbuild_log.txt with /usr/opt/luntbuild/logs/luntbuild_log.txt
  • root@luntbuild_zone:/usr/opt/luntbuild# mkdir /var/lib/tomcat5/webapps/luntbuild
  • root@luntbuild_zone:/usr/opt/luntbuild# cp -r /usr/opt/luntbuild/web/* /var/lib/tomcat5/webapps/luntbuild
  • root@luntbuild_zone:/usr/opt/luntbuild# rm /var/lib/tomcat5/webapps/luntbuild/WEB-INF/lib/commons-logging-1.0.4.jar (you will see ClassNotFoundExceptions otherwise since there is also a commons-logging.jar in /java/share that is installed by Nexenta when tomcat5 is installed)
  • root@luntbuild_zone:/usr/opt/luntbuild# vi /etc/tomcat5/policy.d/05luntbuild.policy (this is the policy file that grants permissions to the luntbuild jsps, classes and libraries, particularly to the Terracotta, Spring and cglib jars which access a number of restricted methods and properties)


    grant codeBase "file:${catalina.home}/webapps/luntbuild/WEB-INF/lib/-" {
    permission java.util.PropertyPermission "*", "read,write";
    permission java.lang.RuntimePermission "shutdownHooks";
    permission java.lang.RuntimePermission "getProtectionDomain";
    permission java.lang.RuntimePermission "accessDeclaredMembers";
    permission java.lang.RuntimePermission "createClassLoader";
    permission java.lang.RuntimePermission "setContextClassLoader";
    permission java.lang.reflect.ReflectPermission "suppressAccessChecks";
    permission java.io.FilePermission "${java.home}/-", "read";
    permission ognl.OgnlInvokePermission "*";
    };

    grant codeBase "file:${catalina.home}/webapps/luntbuild/WEB-INF/classes/-" {
    permission java.util.PropertyPermission "*", "read,write";
    permission java.lang.RuntimePermission "shutdownHooks";
    permission java.lang.RuntimePermission "getProtectionDomain";
    permission java.lang.RuntimePermission "accessDeclaredMembers";
    permission java.lang.RuntimePermission "createClassLoader";
    permission java.lang.RuntimePermission "setContextClassLoader";
    permission java.lang.reflect.ReflectPermission "suppressAccessChecks";
    permission java.io.FilePermission "${java.home}/-", "read";
    permission ognl.OgnlInvokePermission "*";
    };

    grant codeBase "file:${catalina.home}/webapps/luntbuild/-" {
    permission java.io.FilePermission "${catalina.home}/temp", "read";
    permission java.io.FilePermission "${catalina.home}/temp/-", "read,write,delete";
    permission java.io.FilePermission "/usr/opt/luntbuild", "read,write,delete";
    permission java.io.FilePermission "/usr/opt/luntbuild/-", "read,write,delete";
    permission java.io.FilePermission "/usr/opt/luntbuild/logs", "read,write,delete";
    permission java.io.FilePermission "/usr/opt/luntbuild/logs/-", "read,write,delete";
    permission java.io.FilePermission "/usr/opt/luntbuild/db", "read,write,delete";
    permission java.io.FilePermission "/usr/opt/luntbuild/db/-", "read,write,delete";
    permission java.io.FilePermission "/usr/opt/luntbuild/tmp", "read,write,delete";
    permission java.io.FilePermission "/usr/opt/luntbuild/tmp/-", "read,write,delete";
    permission java.io.FilePermission "/usr/opt/luntbuild/tmp/dummy", "read,write,delete";
    };


  • root@luntbuild_zone:/usr/opt/luntbuild# chown -R tomcat5 /usr/opt/luntbuild (the tomcat process runs as the tomcat5 user)
  • root@luntbuild_zone:/usr/opt/luntbuild# chown -R tomcat5 /var/lib/tomcat5/webapps/luntbuild
  • root@luntbuild_zone:/usr/opt/luntbuild# /etc/init.d/tomcat5 start
  • With a browser, navigate to http://192.168.0.111:8180/luntbuild/ and you should be redirected to the Luntbuild project administration page!

Installing JDK 6 in a Nexenta Zone

In the spirit of maintaining and re-factoring this blog, the following instructions have been extracted from a previous entry related to building Eclipse and from a posting that I am currently working on related to installing tomcat with luntbuild.

Get the Sun JDK 6 download. Do NOT get the Solaris x86 packages. Instead get the self-extracting file. If you get the package installation to work, then I would love to get your instructions for this. Personally, I spent quite a bit of time on this task and pretty much had it working after installing a bunch of extra packages like sunwmfrun from the Solaris 11 install CDs and by brute-force trial and error. Eventually I stopped because the self-extracting installer is so much easier and has fulfilled my JDK needs (tomcat, the Eclipse build) so far.
I chose to install write these instructions in the context of JDK 6, but they can probably be easily extended to include JDK 5, JDK 7 or OpenJava.

These instructions are performed from inside a clean, new, base Nexenta Zone. Also see the instructions for setting up a new zone.

Step 1: Install Nexenta Dependencies


To use the self-extracting installer, you will need to make sure you have a couple of Nexenta packages. These commands can be run from a terminal.
  • root@my_zone:~# apt-get install sunwesu (if you do not have this package, you will see a checksum error when you run the executable).
  • root@my_zone:~# apt-get install nevada-compat (if you do not have this package, you will see a libCrun.so.1 error when the script runs unpack200 -- there is a posting in the Nexenta forum with more information about this error.

Step 2: Extract the JDK


Copy the JDK 6 self-extracting archive (jdk-6u2-solaris-i586.sh) to /usr/opt (I often use /usr/opt/, but you can choose whatever directory you choose).
  • root@my_zone:~# /sbin/sh (use /sbin/sh for executing the self-extracting archive or else you will see a checksum error).
  • # ./jdk-6u2-solaris-i586.sh

Thursday, October 18, 2007

Creating a New Zone in Nexenta

In the spirit of maintaining and re-factoring this blog, the following instructions have been extracted from previous entries related to building Eclipse and setting up Subversion on Nexenta.

These instructions were originally take from an article on the main Nexenta site.
I generally choose to install large new components (like web servers or source control systems or IDEs whose build-process takes longer than an hour) in their own zone so that I can figure out their dependencies and so that they do not interfere with any of the existing software in my root zone (or so that my root zone does not interfere with the intended operation of the new component). Mainly, I am just tired of re-installing Nexenta because some packages have caused destruction when I have built them in the past (what in the world did the JDK 1.4 and JDK 5 solaris packages do to my /usr/bin simlink!?) It is easier to re-install a zone than it is to re-install the whole OS. Also, by using zones, I can pretend that my scm and database and web servers all exist on different computers on my home network, and that makes me feel like a bigshot.
I did notice one unfortunate side effect to installing a zone for the first time -- for some reason, in / and in the directories off /, there is only 5GB out of 65GB of space available for files. In /export/home/, however all 65GB are available. So my convention is just to install all my zones and all my 3rd-party software off /export/home and to leave that 5GB of space off / just for core OS packages. I think that is reasonable. If you do not find that to be reasonable, then you might want to re-consider using Nexenta zones for now if you cannot find an acceptable way around this issue.
Creating a zone is not quite as straightforward as in the original article and you can see why that is in threads on the Nexenta forum.
These instructions can be performed from a terminal.
  • timezra@nexentaos:~$ sudo zonecfg -z my_zone
    my_zone: No such zone configured
    Use 'create' to begin configuring a new zone.
  • zonecfg:my_zone> create
  • zonecfg:my_zone> set zonepath=/export/home/zones/my_zone
  • zonecfg:my_zone> set autoboot=false
  • zonecfg:my_zone> add net
  • zonecfg:my_zone:net> set address=192.168.0.111 (or whatever ip address makes sense on your local network)
  • zonecfg:my_zone:net> set physical=sfe0
  • zonecfg:my_zone:net> end
  • zonecfg:my_zone> remove inherit-pkg-dir dir=/lib
  • zonecfg:my_zone> remove inherit-pkg-dir dir=/platform
  • zonecfg:my_zone> remove inherit-pkg-dir dir=/sbin
  • zonecfg:my_zone> remove inherit-pkg-dir dir=/usr
  • zonecfg:my_zone> verify
  • zonecfg:my_zone> commit
  • zonecfg:my_zone> ^D
  • timezra@nexentaos:~$ zoneadm list -vc (this will tell you if my_zone is configured)
  • timezra@nexentaos:~$ sudo vi /usr/lib/nexenta-zones/elatte-unstable.bootstrap
  • Replace the reference to jkaudio-toolsva8233 in work_out_debs() with sunwvia823x
  • timezra@nexentaos:~$ sudo zoneadm -z my_zone install
  • find the directory in / with a name like a UUID
  • timezra@nexentaos:~$ sudo mv /<UUID>/root /export/home/zones/my_zone/root
  • timezra@nexentaos:~$ sudo rmdir <UUID>
  • timezra@nexentaos:~$ sudo zoneadm -z my_zone boot
  • timezra@nexentaos:~$ zoneadm list -vc (my_zone should now be running)
  • timezra@nexentaos:~$ sudo zlogin my_zone
    [Connected to zone 'my_zone' pts/2]
    root@my_zone:~#
Congratulations, you are now logged into my_zone!

Re-factoring Blog Entries.

As I started to write a blog entry about installing Tomcat with Luntbuild on Nexenta, I noticed that a few themes have started to repeat themselves from previous entries, i.e., the initial setup of a Solaris Zone and the installation of the JDK in a Zone. This presents me with an interesting dilemma: should I simply copy-paste-modify those lines from a previous blog entry, or should I re-factor from the specific to the general, give those their own space and change the original blog to reference the new, generic entry? This seems to raise a question about the nature of this blog: is it an organic journal of the specific steps taken on a journey toward some unknown end, or is each entry a constantly-evolving atom where the posted date represents only the inception of the kernel of the posted idea and not necessarily the finality of the written words?
For now, I have chosen the revisionist path with this restriction: I will try my darndest to ensure that no information is lost as entries are shifted and re-arranged and as the generic is extracted from the specific. As much as a day-to-day linear progression of thought would be personally valuable, in the end the repetition of similar items or the tracking of half-formed ideas interspersed across days could end up being a tedious and convoluted mess that I will ultimately be disinclined to maintain and that no one will want to read. Of course, constant referencing and de-referencing can be equally tedious and convoluted, so I will try as well to be politic in the sections I choose to re-factor.

Tuesday, October 16, 2007

Installing SVN 1.4 in a Nexenta Zone

Nexenta already provides a package for installing Subversion, but it is SVN 1.3. My goal in this posting is to install SVN 1.4 (the latest is 1.4.5) with Apache in a new Zone. I prefer to use a new Zone because it helps me determine all dependencies that I need to install alongside the primary package I am installing, it will keep my Subversion install free from any side effects of other programs, and a new Zone will look like a different computer with its own ip address on my network.

Step 1: Create a Subversion Zone


See these instructions for setting up a new zone for Nexenta. I named my zone svn_zone and put it in /export/home/zones/svn_zone.
While the Nexenta zones tutorial gives you a shortcut for installing apache2 along with the base zone install, I do NOT recommend this, as my install hung Configuring apache2 when I originally tried. In any case, it is no big deal installing the base zone first and then explicitly installing the apache2 package.

Step 2: Setup the Subversion Dependencies


  • root@svn_zone:~# apt-get install apache2
  • root@svn_zone:~# apt-get install apache2-dev (for apr-util)
  • root@svn_zone:~# apt-get install libneon25 (for ra WebDAV support)
  • root@svn_zone:~# apt-get install libneon25-dev (for neon-config)
  • root@svn_zone:~# apt-get install gcc
  • root@svn_zone:~# apt-get install make
  • root@svn_zone:~# apt-get install python (we will use this for running make check)

Step 3: Install Subversion 1.4


Download the SVN source code
  • copy subversion-1.4.5.tar into /usr/opt and untar it
  • root@svn_zone:~# cd /usr/opt/subversion-1.4.5
  • root@svn_zone:/usr/opt/subversion-1.4.5~# ./configure
  • root@svn_zone:/usr/opt/subversion-1.4.5~# make
  • root@svn_zone:/usr/opt/subversion-1.4.5~# make install
  • root@svn_zone:/usr/opt/subversion-1.4.5~# make check

Step 4: Create a New Repository


This post helped with some of the following instructions.
  • root@svn_zone:~# mkdir /usr/local/svn_repository
  • root@svn_zone:~# svnadmin create /usr/local/svn_repository
  • root@svn_zone:~# chown -R nobody /usr/local/svn_repository (apache2 runs as 'nobody')

Step 5: Setup Apache for Basic Authentication


  • root@svn_zone:~# htpasswd -cm /usr/local/svn_repository/conf/svn_users svn_admin (this sets up a users file with the user svn_admin and will prompt you for a password)
  • root@svn_zone:~# vi /etc/apache2/httpd.conf
The httpd.conf file should already contain the following two lines
LoadModule dav_svn_module /usr/lib/apache2/modules/mod_dav_svn.so
LoadModule authz_svn_module /usr/lib/apache2/modules/mod_authz_svn.so

Before those two lines add another line to explicitly make sure the dav_module is loaded; otherwise you will get an error similar to this:
Cannot load /usr/lib/apache2/modules/mod_dav_svn.so into server: ld.so.1: apache2: fatal: relocation error: file /usr/lib/apache2/modules/mod_dav_svn.so: symbol dav_xml_get_cdata: referenced symbol not found.

LoadModule dav_module /usr/lib/apache2/modules/mod_dav.so

Add the following section to the end of httpd.conf:
<Location /svn>
DAV svn
SVNPath /usr/local/svn_repository
AuthType Basic
AuthName "Subversion repository"
AuthUserFile /usr/local/svn_repository/conf/svn_users
Require valid-user
</Location>

# restart apache2
  • root@svn_zone:~# apache2 -k restart

Now try to open http://192.168.0.110/svn in your browser from the root Zone. You should be prompted for a username and password and then you will be brought to a screen with this information:

Revision 0: /
Powered by Subversion version 1.4.5 (r25188).

You now have a Zone dedicated to running Subversion 1.4.5 with Apache using Basic Authentication!

Tuesday, October 9, 2007

Building Eclipse for solaris gtk x86 on Nexenta

As this is my first post, I wanted to contribute something useful.   Hopefully this post will help someone somewhere.  I am trying to solve the following problems:
  • How to install Nexenta and upgrade to the latest version (as of 10-08-2007).  Installation is easy, upgrading is not. 
  • How to install a zone so that we have a clean area for building Eclipse;  hopefully I will give you enough to get started in the latest version of Nexenta.
  • How to unpack Java and SunStudio to setup for an Eclipse build.
  • How to modify the Eclipse build scripts to create a distribution of solaris-gtk-x86 3.3 that runs on Nexenta.  Unfortunately, solaris-gtk-x86 is not a supported Eclipse distribution, and the scripts require a bit of change, but these steps should give you a good starting point and hopefully will give you an understanding of which parts of Eclipse are os-specific.

Without further ado, the first step in this process is below.  This should be an easy one, but it will be time-consuming to burn the .iso image and to install the OS.

Step 1: Install Nexenta Alpha 6


  • This is my hardware: Intel P3 750 with 1GB RAM and an 80GB hard drive.
  • Download the Alpha 6 .iso. I have read some postings that the CD install of Alpha 7 may not work and I have not tried to install this version. I prefer to upgrade instead.

Step 2: Upgrade Nexenta from Alpha 6 to the latest version in the Testing repository


Unfortunately, this is not quite as straightforward as it should be. There are threads in the Nexenta forums with information about why the upgrade process takes a couple of extra steps.

These instuctions can be performed from a terminal.
  • sudo apt-get remove samba (for some reason, when I had tried to upgrade previously with samba installed, I got an error that led to disaster in the form of Nested trap rebooting messages and an inability to reboot because of an incomplete upgrade, so I just took it out of the equation temporarily).
  • sudo reboot
  • sudo apt-get clean
  • sudo apt-get update
  • sudo apt-get dist-upgrade (by this point, you probably should have seen the dreaded message telling you to do an apt-get install -f).
  • sudo apt-get install-f (now allow the package manager to remove all your gnome packages but do NOT reboot).
  • sudo apt-get install gnome gnome-applets gnome-control-center gnome-core gnome-desktop-environment gnome-panel gnome-session gnome-terminal (this should re-install all the removed packages and some more).
  • sudo apt-get install totem-gstreamer-firefox-plugin (this one does not get re-installed in step 7, so do it manually).
  • sudo apt-get install dpkg apt (during the upgrade install previously, I had seen errors about the versions of dpkg and apt being incorrect, so I figured I should just upgrade those up front).
  • sudo apt-get update
  • sudo apt-get dist-upgrade (now there should be only one package that is getting removed -- libnewt0.51, but it will get replaced -- and a whole lot of other packages that will be upgraded and installed. This upgrade took about 45 minutes for me because a couple of connections timed-out, but it completed successfully and successfully rebooted after the upgrade).
  • sudo apt-get install samba (we uninstalled this previously).
  • sudo reboot.

Step 3: Create a New Zone


See these instructions for setting up a new zone for Nexenta. I named my zone eclipse_zone and put it in /export/home/zones/eclipse_zone.

Step 4: Install JDK 6 in the eclipse_zone


See these instructions for setting up the JDK in a new base Nexenta zone.

Step 5: Install Sun Studio 12


Even though Nexenta provides installations of gcc and cc, I chose to include a step in here for installing Sun Studio 12. A standalone, non-solaris package version of this is available for download through the Sun Developer Network. It is free to sign up and the download is free.
Again, do NOT download the solaris package version. Instead, download the standalone archive. This will install both Sun Studio and Netbeans 5.5.1.
I use SunStudio in the Eclipse build for its cc compiler, for all native libraries except the SWT (see the script below for the reason). I have not tried to build Eclipse using just the gcc compiler, but I don't see why this would not work with some changes to the build scripts (for example, all -K PIC arguments would need to be changed to -fPIC for gcc). If you have built Eclipse entirely using gcc on Solaris, please send me a link to your instructions as I would be interested in trying this!
  • copy SunStudio12-solaris-x86-200705-ii.tar to /usr/opt
  • root@eclipse_zone:~# cd /usr/opt
  • root@eclipse_zone:/usr/opt# tar -xf SunStudio12-solaris-x86-200705-ii.tar

You should now have SunStudio and Netbeans installed in the eclipse_zone. I have not tried to start SunStudio or Netbeans from inside a zone -- I would guess offhand that this would not work since there is no X server running inside the zone, but it might be worth trying out sometime.

Step 6: Set up Nexenta packages required for Eclipse compilation


There are a few packages that must be installed in the zone before the Eclipse libraries will compile. Some of these packages are installed with the full Nexenta desktop, so if you are installing in the root zone, they may already be available to you. In a different vein, I originally tried to compile the required gtk+ libraries from scratch (along with all the dependencies such as cairo, pango, freetype, etc.). Unfortunately, this turned out to be a rather large time sink for me, as I was able to install the libraries, but I ran into collisions with some of the libraries that already existed from my nexenta install. If you would like all the latest and greatest versions of gtk+, then it might be a good idea for you to contribute those libraries to nexenta's unstable package installation branch. If you are able to do this successfully, I would really like to see some instructions for this. In any case, I did not pursue this because my goal is to get Eclipse 3.3 compiling and running, and the existing nexenta packages fulfill the Eclipse pre-requisites. The following instructions can be performed from a terminal.
  • root@eclipse_zone:~# apt-get install libgnomeui-dev
  • root@eclipse_zone:~# apt-get install libxtst-dev
  • root@eclipse_zone:~# apt-get install libxt-dev
  • root@eclipse_zone:~# apt-get install make
  • root@eclipse_zone:~# apt-get install gcc
  • root@eclipse_zone:~# apt-get install unzip
  • root@eclipse_zone:~# apt-get install zip

Step 7: Install Apache Ant


Finally, a step that is straightforward and that works as expected!
Download the apache ant binary.
  • copy apache-ant-1.7.0-bin.tar to /usr/opt
  • root@eclipse_zone:~# cd /usr/opt
  • root@eclipse_zone:/usr/opt# tar -xf apache-ant-1.7.0-bin.tar

Step 8: Set your environment variables


These environment variables are necessary for the Eclipse build process.
  • root@eclipse_zone:~# export JAVA_HOME=/usr/opt/jdk1.6.0_02
  • root@eclipse_zone:~# export ANT_HOME=/usr/opt/apache-ant-1.7.0
  • root@eclipse_zone:~# export CC=/usr/opt/SUNWspro/bin/cc
  • root@eclipse_zone:~# export PATH=$ANT_HOME/bin:$PATH

Step 9: Dig into the Eclipse build scripts


In my original post I included just a laundry list of commands to modify the Eclipse build scripts from the command-line, but in the spirit of continuous improvement, I have since extracted the commands from that original post into a shell script both to automate the process and because the script better conveys the intention of the modifications I made. This script for building Eclipse 3.3 is now in a dedicated post of its own, along with similar scripts for building Eclipse 3.4M4 and for building Eclipse 3.4M5.

The versions of Eclipse that I am currently running (Europa and Ganymede) were built from these scripts in the global zone, not in an eclipse-specific build zone. As with my install of Pidgin, I often find that it is best to perform an initial build of some software in a dedicated zone to work out dependencies. Since Pidgin and Eclipse both use the X Server graphics libraries, I plan to run them in the global zone. In this case, I decided to perform my actual Eclipse build in the global zone. The instructions below assume that you are building Eclipse in its own zone, but you can certainly perform the build in the global zone as I did.

Originally, I found directions that provide a good starting point and good ideas for scripting some of the process outlined below, but I was not completely successful with the instructions because of the dependency the Eclipse build process has on compiling the cde libraries for Solaris.  For a Nexenta Solaris build, we will not be using the cde libraries, but rather the gnome libraries.  The Eclipse Nexenta build is more like a combination of the Linux and Solaris builds than a straight port of the Solaris Sparc build.

Download the eclipse source build eclipse-sourceBuild-srcIncluded-3.3.zip

  • root@eclipse_zone:~# mkdir /usr/opt/eclipse
  • copy eclipse-sourceBuild-srcIncluded-3.3.zip to /usr/opt/eclipse
  • root@eclipse_zone:~# cd /usr/opt/eclipse
  • copy the script above to /usr/opt/eclipse and name it build_eclipse.sh
  • root@eclipse_zone:/usr/opt/eclipse# chmod 755 build_eclipse.sh
  • root@eclipse_zone:/usr/opt/eclipse# ./build_eclipse.sh


After a long time (on my P3 750Mhz, it takes about 110 minutes), there should be a packaged version of eclipse for solaris x86 with the gtk windowing libraries named /usr/opt/eclipse/result/solaris-gtk-x86-sdk.zip

Keep in mind that you will need to run this version of Eclipse with Java 6, or else you will see a nasty stack trace about the incorrect Java version if you try to launch eclipse. For my own setup, I created a desktop launcher that points to a small wrapper script that looks like this:

#!/bin/sh

export JAVA_HOME=/path/to/jdk1.6.0_02
export PATH=$JAVA_HOME/bin:$PATH
/path/to/eclipse/eclipse

So you should now (hopefully) have a working version of Eclipse on Nexenta.  If you have found this helpful, or if you find any improvements that can be made, please let me know.

Note: since first posting this entry, I have received a good amount of feedback and it has developed into the Solipse project.  I am happy this initial post was useful to a number of people and am happy to keep contributing toward an officially-supported eclipse solaris-gtk-x86 distribution.

Monday, October 8, 2007

Statement of Intent

This blog is not an advertisement for what I know, but an exploration of what I do not know. Admitting how much I do not know is the first step in overcoming my fear of looking foolish. I will make mistakes, but my intent is to learn from those mistakes and hopefully to uncover information useful to someone somewhere.
My first post is a laundry list of haphazard steps for bringing a clean computer from a Nexenta Alpha 6 install to a running build of Eclipse for solaris-gtk-x86. I am not a Unix or a Linux guy, but I am interested in the problem that Nexenta is trying to solve (i.e., combining the OpenSolaris kernel with the gnu utilities and the debian package manager). I am only slightly an Eclipse guy in that I have been developing an RCP application for the past 10 months. I am not involved with the Eclipse project.
Subsequent posts in the near future will probably be a reflection of the tips and tricks I encounter while doing Eclipse RCP development or Java development, but they may branch into areas of process (I recently accepted a position at an Agile company) or higher-level software engineering.
Hopefully these future posts will be shorter.