Goal
The goal of this entry is to embed an AWT and Swing component in an Eclipse Editor and to bind the AWT selection change events to the Eclipse Selection Service.
Create a Swing Tree and Tree Model
Because we will be combining AWT components with an Eclipse Editor, we should first create a Plug-in project that will contribute to the UI. For this example, the project can be named timezra.blog.swt_awt_selection_binding.
For the Swing components, we will use the example from the Sun Tree Tutorial as a basis for our JTree and TreeModel.
The Model Object
package timezra.blog.swt_awt_selection_binding.awt;

public class BookInfo {
  public final String bookName;
  public final String bookURL;

  public BookInfo(final String bookName, final String bookURL) {
    this.bookName = bookName;
    this.bookURL = bookURL;
  }

  @Override
  public String toString() {
    return bookName;
  }
}
We can use a factory method to build the JTree and populate the backing TreeModel.
package timezra.blog.swt_awt_selection_binding.awt;

import javax.swing.JTree;
import javax.swing.tree.DefaultMutableTreeNode;
import javax.swing.tree.DefaultTreeModel;

public final class JTreeFactory {
  private JTreeFactory() {
    // singleton
  };

  public static JTree create() {
    final DefaultMutableTreeNode top = new DefaultMutableTreeNode(
        "The Java Series");
    final DefaultMutableTreeNode category = new DefaultMutableTreeNode(
        "Books for Java Programmers");
    top.add(category);
    category.add(new DefaultMutableTreeNode(new BookInfo(
        "The Java Tutorial: A Short Course on the Basics",
        "tutorial.html")));
    category.add(new DefaultMutableTreeNode(new BookInfo(
        "The Java Tutorial Continued: The Rest of the JDK",
        "tutorialcont.html")));
    category.add(new DefaultMutableTreeNode(new BookInfo(
        "The JFC Swing Tutorial: A Guide to Constructing GUIs",
        "swingtutorial.html")));
    category.add(new DefaultMutableTreeNode(new BookInfo(
        "Effective Java Programming Language Guide", "bloch.html")));
    category.add(new DefaultMutableTreeNode(new BookInfo(
        "The Java Programming Language", "arnold.html")));
    category.add(new DefaultMutableTreeNode(new BookInfo(
        "The Java Developers Almanac", "chan.html")));
    return new JTree(new DefaultTreeModel(top));
  }
}
Create an Eclipse Editor
We can create a very basic Eclipse Editor and contribute it through the plugin.xml. Here, the editor is opened for any file with the .book extension.

In order to bind the Swing component to the SWT Composite, we can use the SWT_AWT Bridge. We will wrap the JTree with an AWT Panel and place that Panel in the Frame returned by the SWT_AWT factory. Also, for this example, we will ensure that all the TreeNodes are expanded in the JTree.
package timezra.blog.swt_awt_selection_binding.editors;

import java.awt.Frame;
import java.awt.Panel;
import javax.swing.JTree;
import org.eclipse.core.runtime.IProgressMonitor;
import org.eclipse.swt.SWT;
import org.eclipse.swt.awt.SWT_AWT;
import org.eclipse.swt.widgets.Composite;
import org.eclipse.ui.IEditorInput;
import org.eclipse.ui.IEditorSite;
import org.eclipse.ui.PartInitException;
import org.eclipse.ui.part.EditorPart;
import timezra.blog.swt_awt_selection_binding.awt.JTreeFactory;

public class JTreeEditor extends EditorPart {

  @Override
  public void doSave(final IProgressMonitor monitor) {
    // no-op
  }

  @Override
  public void doSaveAs() {
    // no-op
  }

  @Override
  public void init(final IEditorSite site, final IEditorInput input)
      throws PartInitException {
    setSite(site);
    setInput(input);
  }

  @Override
  public boolean isDirty() {
    return false;
  }

  @Override
  public boolean isSaveAsAllowed() {
    return false;
  }

  @Override
  public void setFocus() {
    // no-op
  }

  @Override
  public void createPartControl(final Composite parent) {
    final Panel panel = new Panel();
    final JTree jTree = JTreeFactory.create();
    panel.add(jTree);
    for (int i = 0; i < jTree.getRowCount(); i++) {
      jTree.expandRow(i);
    }
    final Composite container = new Composite(parent, SWT.EMBEDDED);
    final Frame frame = SWT_AWT.new_Frame(container);
    frame.add(panel);
  }
}
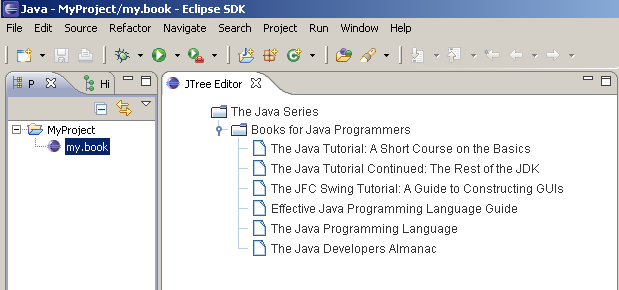
If we run with a new Eclipse launch configuration, create a default project and a stub .book file we will now see the Editor with the embedded AWT and Swing components.
Create a SelectionProvider
We are ready to create a JTreeSelectionProvider which listens for AWT selection events and broadcasts those events to the Eclipse Workbench. Note that the TreeSelectionAdapter is responsible for ensuring that SelectionChangedEvents are dispatched on the SWT Display thread; otherwise, the events will be dispatched on the AWT Event Thread.
package timezra.blog.swt_awt_selection_binding.editors;

import java.util.ArrayList;
import java.util.HashMap;
import java.util.List;
import java.util.Map;
import javax.swing.JTree;
import javax.swing.event.TreeSelectionEvent;
import javax.swing.event.TreeSelectionListener;
import javax.swing.tree.DefaultMutableTreeNode;
import javax.swing.tree.TreePath;
import org.eclipse.jface.viewers.ISelection;
import org.eclipse.jface.viewers.ISelectionChangedListener;
import org.eclipse.jface.viewers.ISelectionProvider;
import org.eclipse.jface.viewers.SelectionChangedEvent;
import org.eclipse.jface.viewers.StructuredSelection;
import org.eclipse.swt.widgets.Display;

class JTreeSelectionProvider implements ISelectionProvider {

  private final Map<ISelectionChangedListener, TreeSelectionListener> swt2Swing;
  private final JTree tree;

  JTreeSelectionProvider(final JTree tree) {
    this.tree = tree;
    swt2Swing = new HashMap<ISelectionChangedListener, TreeSelectionListener>();
  }

  public void addSelectionChangedListener(
      final ISelectionChangedListener listener) {
    final TreeSelectionAdapter adapter = new TreeSelectionAdapter(listener);
    swt2Swing.put(listener, adapter);
    tree.addTreeSelectionListener(adapter);
  }

  public void removeSelectionChangedListener(
      final ISelectionChangedListener listener) {
    tree.removeTreeSelectionListener(swt2Swing.get(listener));
  }

  public ISelection getSelection() {
    final TreePath[] paths = tree.getSelectionPaths();
    if (paths == null) {
      return StructuredSelection.EMPTY;
    }
    final List<Object> selections = new ArrayList<Object>();
    for (final TreePath path : paths) {
      selections.add(((DefaultMutableTreeNode) path.getLastPathComponent())
          .getUserObject());
    }
    return new StructuredSelection(selections);
  }

  public void setSelection(final ISelection selection) {
    // not yet implemented
  }

  private final class TreeSelectionAdapter implements TreeSelectionListener {

    private final ISelectionChangedListener listener;

    TreeSelectionAdapter(final ISelectionChangedListener listener) {
      this.listener = listener;
    }

    public void valueChanged(final TreeSelectionEvent e) {
      Display.getDefault().asyncExec(new Runnable() {
        @Override
        public void run() {
          listener.selectionChanged(new SelectionChangedEvent(
              JTreeSelectionProvider.this, getSelection()));
        }
      });
    }
  }
}
We may then register this ISelectionProvider with our Eclipse Editor Site.
public class JTreeEditor extends EditorPart {
  ....
  public void createPartControl(final Composite parent) {
    ....
    getSite().setSelectionProvider(new JTreeSelectionProvider(jTree));
  }
  ....
}
Create a Command
To test whether the provider properly propagates selection events, we can create a new Command. For our test, the command should only be enabled if a single BookInfo is selected. All the command contribution and enablement information can be configured through extension points.
Here, the command handler is enabled when exactly one instance of BookInfo is selected.

The command handler implementation displays the Book information in a message dialog.
package timezra.blog.swt_awt_selection_binding.handlers;

import org.eclipse.core.commands.AbstractHandler;
import org.eclipse.core.commands.ExecutionEvent;
import org.eclipse.core.commands.ExecutionException;
import org.eclipse.jface.dialogs.MessageDialog;
import org.eclipse.jface.viewers.IStructuredSelection;
import org.eclipse.ui.IWorkbenchWindow;
import org.eclipse.ui.handlers.HandlerUtil;
import timezra.blog.swt_awt_selection_binding.awt.BookInfo;

public class BookInfoSelectionHandler extends AbstractHandler {
  public Object execute(final ExecutionEvent event) throws ExecutionException {
    final IWorkbenchWindow window = HandlerUtil
        .getActiveWorkbenchWindowChecked(event);
    final BookInfo book = (BookInfo) ((IStructuredSelection) HandlerUtil
        .getCurrentSelectionChecked(event)).getFirstElement();
    MessageDialog.openInformation(window.getShell(), "Book Info", book
        .toString());
    return null;
  }
}
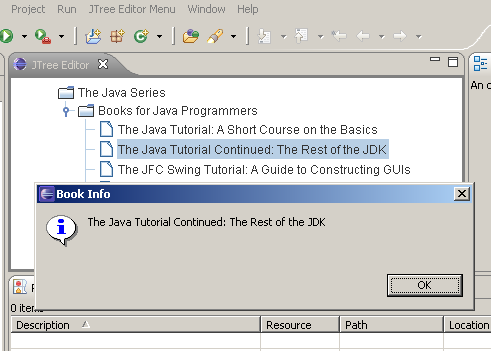
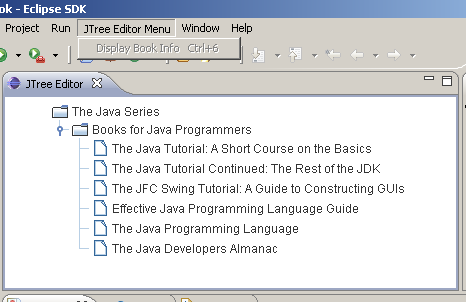
If we run with our SWT_AWT launch configuration again, this time, we will notice the new command contribution and we will see that the selection of different TreeNodes affects the behavior of the command contribution.
When no BookInfo is selected, the command is disabled.
When exactly one BookInfo is selected, the command is enabled.
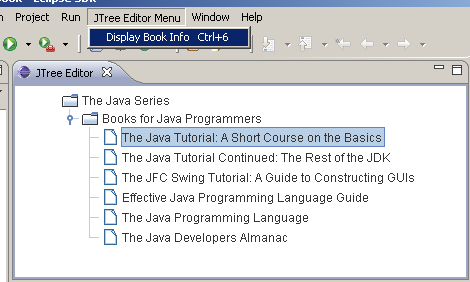
The BookInfo is displayed in a message dialog.