Goal
The purpose of this entry is to provide a short tutorial for setting up a Maven2 project that uses Spring 3.0 to schedule a Quartz batch job, to inject Spring-managed beans into this Quartz-managed job, to use Spring to test the job, and to setup a distributable, runnable assembly for the project.
Setup a New Maven Project
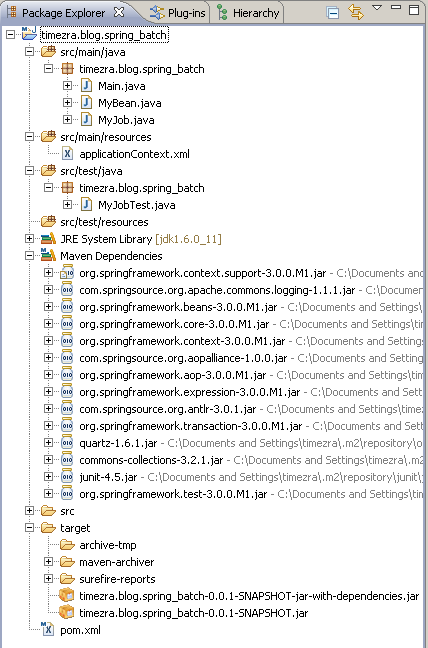
Setting up a new Maven project in Eclipse with the m2eclipse plug-in is straightforward, even without the fancy pom editors. For this example, we can create a simple project (skip archetype selection) and package the target as a jar.

Add Repositories and Register Dependencies
Because Spring 3.0.0.M1 is currently not available in the main Maven repositories, we will need to add custom repositories to our pom.xml (Thanks to Chris Beams for his instructions).
We are particularly interested in org.springframework.context.support, which contains the Spring-Quartz bridge that has been separated out from the core spring.jar between Spring 2.5 and 3.0; org.springframework.transaction, which the Spring-Quartz bridge depends on; commons-collections, which the Spring-Quartz bridge also depends on; and quartz from OpenSymphony.
Our new pom.xml should look like this:
<project xmlns="http://maven.apache.org/POM/4.0.0" xmlns:xsi="http://www.w3.org/2001/XMLSchema-instance"
xsi:schemaLocation="http://maven.apache.org/POM/4.0.0 http://maven.apache.org/maven-v4_0_0.xsd">
<modelVersion>4.0.0</modelVersion>
<groupId>timezra.blog.spring_batch</groupId>
<artifactId>timezra.blog.spring_batch</artifactId>
<name>timezra.blog.spring_batch</name>
<version>0.0.1-SNAPSHOT</version>
<description>Spring Batch Example</description>
<dependencies>
<dependency>
<groupId>org.springframework</groupId>
<artifactId>org.springframework.context.support</artifactId>
<version>3.0.0.M1</version>
</dependency>
<dependency>
<groupId>org.springframework</groupId>
<artifactId>org.springframework.transaction</artifactId>
<version>3.0.0.M1</version>
</dependency>
<dependency>
<groupId>org.opensymphony.quartz</groupId>
<artifactId>quartz</artifactId>
<version>1.6.1</version>
</dependency>
<dependency>
<groupId>commons-collections</groupId>
<artifactId>commons-collections</artifactId>
<version>3.2.1</version>
</dependency>
</dependencies>
<repositories>
<repository>
<id>SpringSource Enterprise Bundle Repository - External Bundle Milestones</id>
<url>http://repository.springsource.com/maven/bundles/milestone</url>
</repository>
<repository>
<id>SpringSource Enterprise Bundle Repository - SpringSource Bundle Releases</id>
<url>http://repository.springsource.com/maven/bundles/release</url>
</repository>
<repository>
<id>SpringSource Enterprise Bundle Repository - External Bundle Releases</id>
<url>http://repository.springsource.com/maven/bundles/external</url>
</repository>
</repositories>
</project>
NB: As Spring 3.0.0 becomes generally available, registering custom repositories will no longer be necessary, and the necessary versions of the Spring dependencies may change.
Create the Spring Application
We are now ready to register a batch job with Spring in a /src/main/resources/applicationContext.xml file. This registration requires three components: a job declaration, a trigger that depends on the registered job, and a scheduler that depends on the trigger. In our case, we would also like to declare a separate Spring-managed bean and inject that as a dependency into the job. A sample applicationContext.xml would look like this, where our (unimplemented) job will run every five seconds:
<?xml version="1.0" encoding="UTF-8"?>
<beans xmlns="http://www.springframework.org/schema/beans"
xmlns:xsi="http://www.w3.org/2001/XMLSchema-instance"
xsi:schemaLocation="http://www.springframework.org/schema/beans
http://www.springframework.org/schema/beans/spring-beans.xsd">
<bean id="myBean" class="timezra.blog.spring_batch.MyBean">
<property name="name" value="My Name" />
</bean>
<bean name="jobDetail" class="org.springframework.scheduling.quartz.JobDetailBean">
<property name="jobClass" value="timezra.blog.spring_batch.MyJob" />
<property name="jobDataAsMap">
<map>
<entry key="myBean">
<ref bean="myBean" />
</entry>
</map>
</property>
</bean>
<bean id="jobDetailTrigger" class="org.springframework.scheduling.quartz.CronTriggerBean">
<property name="jobDetail" ref="jobDetail" />
<property name="cronExpression" value="0/5 * * * * ?" />
</bean>
<bean id="schedulerFactoryBean"
class="org.springframework.scheduling.quartz.SchedulerFactoryBean">
<property name="triggers">
<list>
<ref bean="jobDetailTrigger" />
</list>
</property>
</bean>
</beans>
NB: Spring injects the myBean dependency through the jobDataAsMap property on the JobDetailBean.
The MyBean.java implementation can be as simple as
package timezra.blog.spring_batch;
public class MyBean {
private String name;
public String getName() {
return name;
}
public void setName(final String name) {
this.name = name;
}
}
MyJob.java contains the logic for our batch job.
package timezra.blog.spring_batch;
import org.quartz.JobExecutionContext;
import org.quartz.JobExecutionException;
import org.quartz.StatefulJob;
import org.springframework.scheduling.quartz.QuartzJobBean;
public class MyJob extends QuartzJobBean implements StatefulJob {
private MyBean myBean;
public MyJob() {
System.out.println("MyJob.MyJob()");
}
@Override
protected void executeInternal(final JobExecutionContext context) throws JobExecutionException {
System.out.println("myBean's name=[" + myBean.getName() + "] and its instance is [" + myBean + "].");
}
public void setMyBean(final MyBean myBean) {
this.myBean = myBean;
}
}
NB: For this example, we have created a mutator so myBean can be injected, we print whenever a new Job is constructed, and when the job runs, we print the name of myBean and its instance.
Create a Main Runner
We can easily create a runner for the batch job just to get a feel for what is happening as the Spring container is initialized, as Spring starts the Quartz scheduler and as the Quartz scheduler runs. We simply need to create an ApplicationContext with our applicationContext.xml.
package timezra.blog.spring_batch;
import org.springframework.context.support.ClassPathXmlApplicationContext;
public class Main {
public static void main(final String[] args) {
new ClassPathXmlApplicationContext("/applicationContext.xml");
}
}
If we run this file as a java application, we see that every five seconds, a new instance of our job is created (which is not necessarily surprising) and the job is executed with the same instance of myBean (which should be anticipated).
Scope MyBean as Prototype
Suppose we want a new instance of myBean for each execution of the job. If Spring were managing the lifecycle of the job instances, this might be as straightforward as declaring the myBean's scope as prototype in the applicationContext.xml.
What happens? The myBean instance that is printed for each run of the job is the same. Quartz, not Spring, is managing the construction of these jobs.
What happens if we specify that the JobDetailBean is a prototype? The instance of myBean in the job is still the same.
Fortunately, it is possible to get a handle on the Spring ApplicationContext from the job by changing only a few lines of code in our applicationContext.xml and in MyJob.java.
Add the Application Context to the Job Data Map
To inject the ApplicationContext into a Job, we need to specify a key for it, so we can retrieve it from the JobExecutionContext's data map. We also will no longer inject the dependency into the job since we will retrieve it directly from the ApplicationContext.
The updated applicationContext.xml should look like this:
....
<bean name="jobDetail" class="org.springframework.scheduling.quartz.JobDetailBean">
<property name="jobClass" value="timezra.blog.spring_batch.MyJob" />
<property name="applicationContextJobDataKey" value="applicationContext" />
</bean>
....
NB: we can set the ApplicationContext's key by specifying the applicationContextJobDataKey property for the JobDetailBean.
The updated MyJob.java now retrieves myBean directly from the ApplicationContext.
package timezra.blog.spring_batch;
import org.quartz.JobExecutionContext;
import org.quartz.JobExecutionException;
import org.quartz.StatefulJob;
import org.springframework.beans.factory.BeanFactory;
import org.springframework.scheduling.quartz.QuartzJobBean;
public class MyJob extends QuartzJobBean implements StatefulJob {
public MyJob() {
System.out.println("MyJob.MyJob()");
}
@Override
protected void executeInternal(final JobExecutionContext context) throws JobExecutionException {
final BeanFactory applicationContext = (BeanFactory) context.getMergedJobDataMap().get("applicationContext");
final MyBean myBean = (MyBean) applicationContext.getBean("myBean");
System.out.println("myBean's name=[" + myBean.getName() + "] and its instance is [" + myBean + "].");
}
}
Test The Batch Job Instance
As we have demonstrated, Spring is not managing the lifecycle of our quartz job directly, only of the JobDetailBean. Whenever I test a Spring-managed bean, I personally prefer that Spring injects an instance of the bean into the test, rather than to call the constructor for that bean directly. After all, the bean under test is a dependency of the test case itself.
While it may not be obvious how we can get an instance of our job inside the test case for that job, it is not difficult, only slightly roundabout. We must specify a JobFactory for the SchedulerFactoryBean explicitly in our applicationContext.xml.
....
<bean id="jobFactory" class="org.springframework.scheduling.quartz.SpringBeanJobFactory"/>
<bean id="schedulerFactoryBean"
class="org.springframework.scheduling.quartz.SchedulerFactoryBean">
<property name="triggers">
<list>
<ref bean="jobDetailTrigger" />
</list>
</property>
<property name="jobFactory" ref="jobFactory" />
</bean>
....
We will also declare a couple of new test-scoped dependencies in our pom.xml.
....
<dependency>
<scope>test</scope>
<groupId>junit</groupId>
<artifactId>junit</artifactId>
<version>4.5</version>
</dependency>
<dependency>
<scope>test</scope>
<groupId>org.springframework</groupId>
<artifactId>org.springframework.test</artifactId>
<version>3.0.0.M1</version>
</dependency>
....
Finally, we can create a JUnit test case, MyJobTest.java, that simulates the triggering of the job. Whether or not wiring together the scheduler, trigger and factory is better than instantiating the job directly depends on your own preference. This technique is simply one approach.
package timezra.blog.spring_batch;
import java.util.Date;
import org.junit.Test;
import org.junit.runner.RunWith;
import org.quartz.Job;
import org.quartz.JobExecutionContext;
import org.quartz.impl.calendar.CronCalendar;
import org.quartz.spi.TriggerFiredBundle;
import org.springframework.beans.factory.annotation.Autowired;
import org.springframework.scheduling.quartz.CronTriggerBean;
import org.springframework.scheduling.quartz.SchedulerFactoryBean;
import org.springframework.scheduling.quartz.SpringBeanJobFactory;
import org.springframework.test.context.ContextConfiguration;
import org.springframework.test.context.junit4.SpringJUnit4ClassRunner;
@RunWith(SpringJUnit4ClassRunner.class)
@ContextConfiguration(locations = { "/applicationContext.xml" })
public class MyJobTest {
@Autowired
private SpringBeanJobFactory jobFactory;
@Autowired
private SchedulerFactoryBean schedulerFactory;
@Autowired
private CronTriggerBean trigger;
@Test
public void theJobPrintsToStandardOut() throws Exception {
final TriggerFiredBundle bundle = new TriggerFiredBundle(trigger.getJobDetail(), trigger,
new CronCalendar(trigger.getCronExpression()), false, new Date(), new Date(), trigger
.getPreviousFireTime(), trigger.getNextFireTime());
final Job job = jobFactory.newJob(bundle);
job.execute(new JobExecutionContext(schedulerFactory.getScheduler(), bundle, job));
}
}
Create an Assembly
Now that we have a batch process, a test suite and a runner, we can create a distribution. Thanks to a comment by Valerio Schiavoni, creating an executable jar with all its dependencies is easy in Maven2. We can add an incantation to our pom.xml that configures the jar to execute our Main.java:
....
<build>
<plugins>
<plugin>
<artifactId>maven-assembly-plugin</artifactId>
<configuration>
<descriptorRefs>
<descriptorRef>jar-with-dependencies</descriptorRef>
</descriptorRefs>
<archive>
<manifest>
<mainClass>timezra.blog.spring_batch.Main</mainClass>
</manifest>
</archive>
</configuration>
</plugin>
</plugins>
</build>
....
We will assemble this distribution by invoking Run As -> Maven assembly:assembly from inside Eclipse.
We can run the jar from the command-line by invoking java -jar timezra.blog.spring_batch-0.0.1-SNAPSHOT-jar-with-dependencies.jar.
We now have a robust infrastructure for easily adding new jobs to our runner, for testing those jobs, and for creating an executable distribution.


