Saturday, December 29, 2007

Packaging a JMock Plugin for Eclipse

I have not seen a standard JMock plug-in for Eclipse (I did not search too closely). In any case, this entry will provide a demonstration for one way to use 3rd-party libraries in your own Eclipse project. Keep in mind that the licensing and distribution of 3rd-party libraries is a different matter entirely (but if anyone out there has any information on it, I would certainly be interested in learning).

Download the JMock library


The latest stable release of JMock is 2.4.0 and can be downloaded here, or in a unix shell with
  • wget http://www.jmock.org/dist/jmock-2.4.0-jars.zip
We will also need to unzip jmock-2.4.0-jars.zip to access the jars.
I am not particularly fond of the way the source and binaries are packed together in some of these libraries. My preference would be to isolate the functional code from the IDE resources (IDE usage appears to be the motivation for the current packaging scheme).

I also like to have the JMock javadocs on hand and we can download them here or in a shell
  • wget http://www.jmock.org/dist/jmock-2.4.0-javadoc.zip

Decide How to Package the Library


I have seen various ways to package 3rd-party libraries in Eclipse plug-ins, and the final word on packaging a library generally comes from the owner. Until jmock.org provides an Eclipse distribution, whatever method we choose will be fine, but it is in no way the authoritative means of distribution.


Embedded as a Jar in a plug-in with custom code
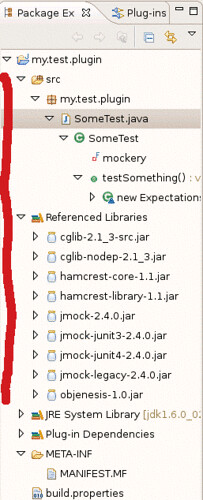
3rd-party libraries in the same plug-in as custom code is not good form.


While this might be fine for very small projects, I would caution against it. There is always a chance that the library owner will create a standard Eclipse plug-in someday, or that someone else will produce an Eclipse plug-in for a functionally equivalent (or better) library, so it is a good idea to keep our code separate from their code.


Unwrapped binary or source plug-in
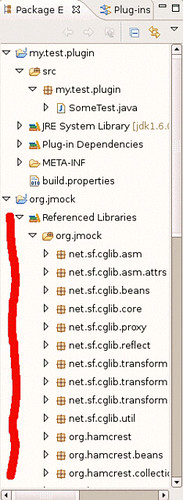
Unpacked 3rd-party libraries in a separate plug-in.


Unless we were planning to modify code in the 3rd-party library (in which case we would be forking the distribution and assuming responsibility for the modified code) there is really no need to unpack the archive. Why should our automated build process spend cycles re-compiling unchanging library source code or re-packing standard binaries? I am confident that library jars inside plug-ins incur little to no performance penalty over plug-in jars with unwrapped binaries (unfortunately, I do not recall where I originally read that and would like to provide a cited reference).


Plug-in containing multiple jars

Multiple packed 3rd-party libraries in a separate plug-in.


This will probably satisfy our requirements. Since the JMock libraries and their dependencies are distributed as a single unit, I feel comfortable putting them all inside a single plug-in and exposing only the top-level org.jmock packages (along with org.hamcrest packages as needed). The PDE provides a good way to manage dependencies among version-ranges of libraries. Because JMock is already provided as a distribution with a single, downloadable file that contains specifically-versioned dependencies, that management is already handled for us (it just happens that the version range is restricted to a single value per library).


Plug-in per jar
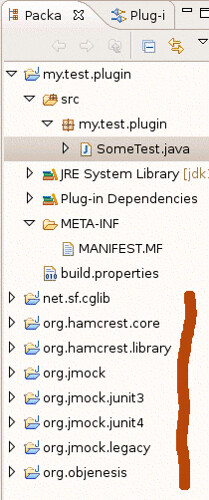
One 3rd-party library per plug-in.


This would be ideal, but, as consumers of the libraries and not as the actual distributors, it should not be up to us to manage declaration of the interdependencies of the libraries and the fine-grained packaging and versioning of these plug-ins for Eclipse. Individual plug-ins probably would not benefit us much over the multi-jar plug-in approach, especially if we plan to upgrade the JMock distribution as new versions become available, and this approach may even add unwanted maintainance costs for re-packaging the libraries into 8 plug-ins, as opposed to 1 plug-in, every few months.


Create a new Eclipse Plug-in Project


Now that we have decided to package the JMock distribution as a single plug-in, the creation of the plug-in project itself is very straightforward with the New Project Wizard.

The New Project Wizard handles most of what we need.

New -> Project... -> Plug-in Development -> Plug-in From existing JAR archives
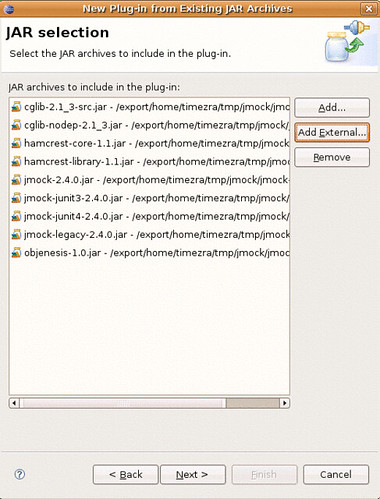
Add the JARs that came with the JMock download.

Select all the JMock JARs that were unzipped from the downloaded archive. If you had originally put these JARs inside a plug-in with your test code and are now moving them into their own plug-in, then you can Add... the JARs from your Workspace. Since we have the JARs stored in some other location on the filesystem, we will Add External....

Choose a name and version for the plug-in and don't forget to un-check the Unzip option!

The final word on the naming and versioning of a plug-in, much as the physical packaging, comes from the owner of the library. If we were planning to modify the JMock source code, then we would probably use the same naming convention that we use for our other plug-in projects, for example we would call our fork of JMock my.company.jmock. Since we are planning to consume JMock as-is, then we will want to give the plug-in a more conventional name, such as org.jmock. Similarly, since we will not modify the libraries, we can follow the current jmock versioning scheme and say that the plug-in has a version of 2.4.0.
By default, the Wizard checks the Unzip the JAR archives into the project option; here we want to uncheck that option.
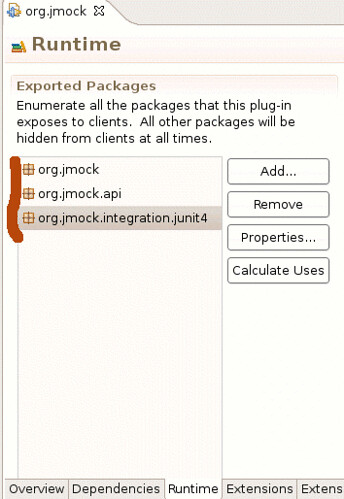

I prefer to restrict the packages that are exported just to what I will access.
By default, the Wizard will automatically export all available Java packages for the plug-in. My preference is to export only those packages that I will access from my test code. To get started, the list includes org.jmock, org.jmock.api and org.jmock.integration.junit4. As we write more tests, we might need some custom matchers that are available in org.hamcrest.Matchers but are not exposed by JMock.

Get JUnit 4.4


Unfortunately, just as with Spring 2.5 JUnit support, JMock has a dependency on JUnit 4.4, but JUnit 4.3 is bundled with Eclipse. If we were to try to use the JMock.class runner in a JUnit 4 test case, we would see the following compilation error:
  • The type org.junit.internal.runners.JUnit4ClassRunner cannot be resolved. It is indirectly referenced from required .class files
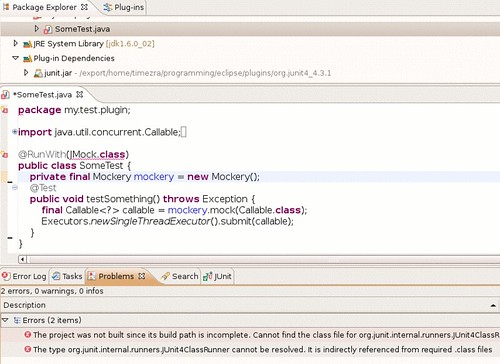
Compilation exception because JMock requires JUnit 4.4.

Since JMock depends on JUnit 4.4, and since we are bundling JMock and its dependencies as a single plug-in, should the JUnit 4.4 jar be included in the same plug-in even though it is not part of the downloadable distribution on jmock.org?  I do not know an absolute right answer.
We can get the JUnit 4.4 jar from here or download it from a unix shell with
  • wget http://downloads.sourceforge.net/junit/junit-4.4.jar?modtime=1184865382&big_mirror=0
We can import the junit-4.4.jar into our org.jmock plug-in with the Import... -> File System Wizard.

Once the junit4.4.jar is in the workspace, we can add it to the plug-in's classpath in the MANIFEST.MF.
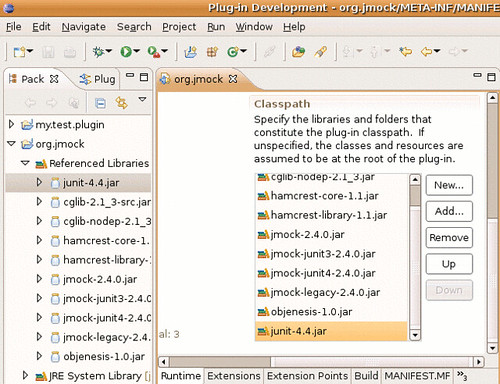
Add Junit4.4 to the plug-in's classpath.

Write a JMock Test Case


The JMock Cookbook is a great resource for getting started with JMock. Our goal is to get a single test-case running with a mock object to verify our plug-in configuration.
We can declare our dependency on org.jmock in our test plug-in's MANIFEST.MF. We want to ensure that org.jmock is declared as a dependency before org.junit4.
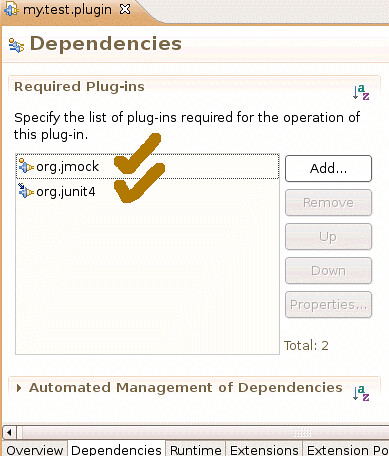
Declare org.jmock before org.junit4 dependency.


I have seen the following initialization error from the JMock test runner if org.junit4 is declared first (presumably because JMock is using JUnit 4.4 and Eclipse is using 4.3)
Failure trace when org.junit4 dependency is declared before org.jmock dependency.

We can create a new test case that uses a Mock Object and the JMock test runner. The following code should be enough:

package my.test.plugin;

import java.util.concurrent.Callable;
import java.util.concurrent.Executors;
import org.jmock.Mockery;
import org.jmock.integration.junit4.JMock;
import org.junit.Test;
import org.junit.runner.RunWith;

@RunWith(JMock.class)
public class SomeTest {
private final Mockery mockery = new Mockery();

@Test
public void testSomething() throws Exception {
final Callable<?> callable = mockery.mock(Callable.class);
Executors.newSingleThreadExecutor().submit(callable).get();
}
}

We should now see a legitimate test failure! We expect that the Executor will call Callable#get, and from the JMock failure trace, that is exactly what happened.
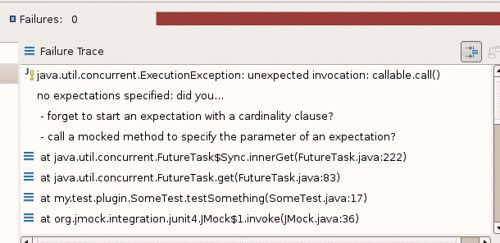
We are expecting our test case to fail.

Now let's emend our test code so that the mock object expects an invokation of Callable#call.

package my.test.plugin;

import org.jmock.Expectations;
....

@Test
public void testSomething() throws Exception {
final Callable<?> callable = mockery.mock(Callable.class);
mockery.checking(new Expectations() {
{
one(callable).call();
}
});
Executors.newSingleThreadExecutor().submit(callable).get();
}
}


We have a green bar!
We are expecting our test case to fail.

It appears that we have successfully incorporated the JMock 3rd-party libraries into a re-usable Eclipse plug-in.

Wednesday, December 26, 2007

An EMF Editor for VoiceXML

The following entry provides a starting point for creating a basic EMF editor for VoiceXML. It is actually very straightforward and provides a good demonstration of the power of EMF for creating a basic, yet powerful editor (with cut-and-paste, drag-and-drop, syntax checking, etc.) for a language with an existing, well-defined schema. My goal here is not to provide a polished, finished editor, but a fully-functional starting point.

Download the VoiceXML Shemas from the W3C website


The VoiceXML schemas can all be downloaded from http://www.w3.org/TR/voicexml21
We will need the following 9 files:
  • vxml.xsd
  • vxml-attribs.xsd
  • vxml-datatypes.xsd
  • vxml-grammar-extension.xsd
  • vxml-grammar-restriction.xsd
  • vxml-synthesis-extension.xsd
  • vxml-synthesis-restriction.xsd
  • grammar-core.xsd
  • synthesis-core.xsd

From a unix shell, you can use the following command to retrieve these files:

wget http://www.w3.org/TR/voicexml21/vxml.xsd \
http://www.w3.org/TR/voicexml21/vxml-attribs.xsd \
http://www.w3.org/TR/voicexml21/vxml-datatypes.xsd \
http://www.w3.org/TR/voicexml21/vxml-grammar-extension.xsd \
http://www.w3.org/TR/voicexml21/vxml-grammar-restriction.xsd \
http://www.w3.org/TR/voicexml21/vxml-synthesis-extension.xsd \
http://www.w3.org/TR/voicexml21/vxml-synthesis-restriction.xsd \
http://www.w3.org/TR/voicexml21/grammar-core.xsd \
http://www.w3.org/TR/voicexml21/synthesis-core.xsd


Modify the VoiceXML Schemas


Unfortunately, the schemas cannot currently be converted directly into Ecore files, but the modifications you will need to make are minor.

In the vxml-attribs.xsd file, remove the import declaration for xml.xsd, or else we may see the following warning:
Warning | XSD: The location 'http://www.w3.org/2001/xml.xsd' has not been resolved | vxml-attribs.xsd | line 23
We can remove the declaration from the file in a shell with these commands:
  • perl -pi -e 's~<xsd:import namespace="http://www.w3.org/XML/1998/namespace"~~' vxml-attribs.xsd
  • perl -pi -e 's~schemaLocation="http://www.w3.org/2001/xml.xsd"/>~~' vxml-attribs.xsd

In the vxml-synthesis-extension.xsd, add an import declaration for vxml.xsd, or else we may see the following error:
Error | XSD: Model group reference 'http://www.w3.org/2001/vxml#executable.content is unresolved | vxml-synthesis-extension.xsd | line 93
We can add this declaration in a shell with this command:
  • perl -pi -e 's~<xsd:include schemaLocation="vxml-attribs.xsd"/>~<xsd:include schemaLocation="vxml-attribs.xsd"/>\n <xsd:include schemaLocation="vxml.xsd"/>~' vxml-synthesis-extension.xsd

Remove the redefinition of speak.attribs in vxml-synthesis-restriction.xsd and hard-code the restriction in synthesis-core.xsd, or else we may see the following error:
Error | XSD: The type of attribute '#version' must derive from '#version.datatype' | vxml-synthesis-restriction.xsd | line 34
We can hard-code this redefinition in a shell with these commands:
  • perl -pi -e 's~<xsd:attributeGroup name="speak.attribs">~~' vxml-synthesis-restriction.xsd
  • perl -pi -e 's~<xsd:attribute name="version" type="version.datatype" fixed="1.0"/>~~' vxml-synthesis-restriction.xsd
  • perl -pi -e 's~<xsd:attribute ref="xml:lang"/>~~' vxml-synthesis-restriction.xsd
  • perl -pi -e 's~<xsd:attribute ref="xml:base"/>~~' vxml-synthesis-restriction.xsd
  • perl -pi -e 's~</xsd:attributeGroup>~~' vxml-synthesis-restriction.xsd
  • perl -pi -e 's~<xsd:attribute name="version" type="version.datatype"/>~<xsd:attribute name="version" type="version.datatype" fixed="1.0"/>~' synthesis-core.xsd

In the vxml-synthesis-restriction.xsd file, remove the import declaration for xml.xsd, or else we may see the following warning:
Warning | XSD: The location 'http://www.w3.org/2001/xml.xsd' has not been resolved | vxml-synthesis-restriction.xsd | line 21
We can remove the declaration from the file in a shell with these commands:
  • perl -pi -e 's~<xsd:import namespace="http://www.w3.org/XML/1998/namespace"~~' vxml-synthesis-restriction.xsd
  • perl -pi -e 's~schemaLocation="http://www.w3.org/2001/xml.xsd"/>~~' vxml-synthesis-restriction.xsd

Replace the xsd:union references in synthesis-core.xsd with the regex restrictions for the unioned datatypes, or else we may see the following when trying to create an EMF project from the schemas:
Error: XSD: The 'memberTypes' attribute must be present or tehre must be contained member types : URI null Line 155 Column 2
Error: XSD: The 'memberTypes' attribute must be present or tehre must be contained member types : URI null Line 159 Column 2
Error: XSD: The 'memberTypes' attribute must be present or tehre must be contained member types : URI null Line 163 Column 2
Error: XSD: The 'memberTypes' attribute must be present or tehre must be contained member types : URI null Line 167 Column 2
Error: XSD: The value '100.0' of attribute 'default' must be one of the members types of 'http://www.w3.org/2001/vxml#volume.datatype' : URI null Line 365 Column 4
We can replace the xsd:union references in synthesis-core.xsd in a unix shell with the following commands:
  • perl -pi -e 's~<xsd:union memberTypes="hertz.number hertz.relative percent semitone height.scale"/>~<xsd:restriction base="xsd:string">\n <xsd:pattern value="(([0-9]+|[0-9]+.[0-9]*|[0-9]*.[0-9]+)Hz)|([+\-]([0-9]+|[0-9]+.[0-9]*|[0-9]*.[0-9]+)Hz)|([+\-]?([0-9]+|[0-9]+.[0-9]*|[0-9]*.[0-9]+)%)|([+\-]([0-9]+|[0-9]+.[0-9]*|[0-9]*.[0-9]+)st)|(x-high|high|medium|low|x-low-default)" />\n </xsd:restriction>~' synthesis-core.xsd
  • perl -pi -e 's~<xsd:union memberTypes="number percent speed.scale"/>~<xsd:restriction base="xsd:string">\n <xsd:pattern value="([0-9]+|[0-9]+.[0-9]*|[0-9]*.[0-9]+)|([+\-]?([0-9]+|[0-9]+.[0-9]*|[0-9]*.[0-9]+)%)|(x-fast|fast|medium|slow|x-slow|default)" />\n </xsd:restriction>~' synthesis-core.xsd
  • perl -pi -e 's~<xsd:union memberTypes="volume.number relative percent volume.scale"/>~<xsd:restriction base="xsd:string">\n <xsd:pattern value="(0*(100.[0-9]*|[0-9][0-9].[0-9]*|[0-9].[0-9]*|.[0-9]+))|([+\-]([0-9]+|[0-9]+.[0-9]*|[0-9]*.[0-9]+))|([+\-]?([0-9]+|[0-9]+.[0-9]*|[0-9]*.[0-9]+)%)|(silent|x-soft|soft|medium|loud|x-loud|default)" />\n </xsd:restriction>~' synthesis-core.xsd


Create an EMF Project From the VoiceXML Schemas


We will need to install 2 plugin-projects in order to generate the EMF model and editor from the VoiceXML schemas:
Eclipse Modelling Framework (EMF) SDK
XML Schema Infoset Model (XSD) Extender SDK

We can install these through the Europa Discovery Site by following this path of menu options:
Help -> Software Updates -> Find and Install... -> Search For New Features To Install -> Europa Discovery Site -> Models and Model Development -> EMF Extender SDK and XSD Extender SDK
EMF Extender SDK and XSD Extender SDK

Now, we are ready to create the EMF Project with a standard menu: File -> New -> Project... -> EMF Project.
We can call the project org.w3.vxml.
Create the EMF Project in the New Project Wizard

We will select the XML model importer from the New Project Wizard.
Select the XML model importer from the New Project Wizard

We can select the nine schemas listed above for generating the genmodel file, which we will call vxml.genmodel.
Select the nine schemas listed above for generating the genmodel file

We can select to generate the packages org.w3._2001.vxml and org.w3.xml._1998.namespace (since the vxml package depends on the xml package).
Generate org.w3._2001.vxml and org.w3.xml._1998.namespace


Modify the Generated Ecore and Genmodel


This step is open-ended, as modifications to the ecore and genmodel files will be as needed, depending on how our target audience will use the editor. Here are a few quick cosmetic changes:
  • In the ecore file, remove any Type suffixes from the model objects (e.g., change AssignType -> Assign, BlockType -> Block, etc.). Unfortunately, since there are both a Meta and MetaType and Metadata and MetadataType elements in the ecore file, these names cannot be changed. Also, if we try to change ObjectType to Object, we will get errors in the generated code.
  • In the ecore file, change Audio -> BaseAudio and Audio1 -> Audio since Audio1 and not Audio is the element that is primarily used. Do the same for Mark and Mark1, SayAs and SayAs1, VersionDatatype and VersionDatatype1, and MixedGrammar, MixedGrammar1 and MixedGrammar11.
  • In the genmodel file, change the Namespace Base Package from org.w3.xml._1998 to org.w3.xml. Likewise, change the VXML Base Package from org.w3._2001 to org.w3.vxml.


Generate the Model, Edit and Editor Code


From the root Vxml Node in the genmodel file, generate the Model code, then the Edit code and then the Editor code. Just like that, the Model Objects, the ItemProviders for displaying the Model in the UI and the multi-tab Editor code has all been generated. So let's try it out!
Generate the model, edit and editor code.

Start Coding VoiceXML


On the Overview page of the /org.w3.vxml.editor/META-INF/MANIFEST.MF form editor, in the Testing section, we will click on Launch an Eclipse application.
In the new Workbench, we will create a New General project and call it hello.world.vxml.
Now, from the New -> Other... wizard, we will create a new Vxml Model (Under Example EMF Creation Wizards) and call it HelloWorld.vxml.
Create a new Vxml Model.

We will select Vxml as the Model Object and Finish the Wizard.
Use Vxml as the Model Object.

In the Editor that is now opened, we can start writing Vxml!
Hello World Vxml in the generated editor.

We can view the emitted VoiceXML with the Text editor.
The emitted Hello World Vxml code.

Tuesday, December 18, 2007

Dynamic Labels for Eclipse Context Menus

The following entry describes a simple way to contribute context menu commands with dynamic labels to an Eclipse view. In my first attempt, I tried to use state to modify the command label but could not get it to work. Instead, I used dynamic commands because the approach was easier to figure out and implement, and the amount of code involved was so small that even if the approach is not ideal, it seems robust and scalable.
You will need rudimentary experience with Eclipse plug-in development to find this post valuable.

Create an Eclipse Plug-in Project


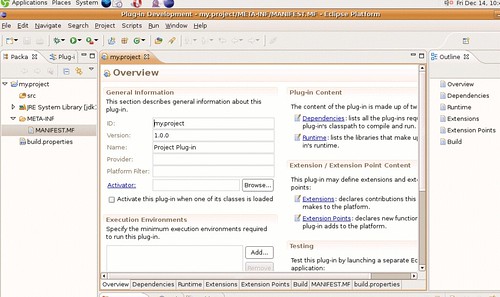
For this example, we do not need anything fancy, just the most basic Eclipse plug-in (File -> New -> Project... -> Plug-in Project). I called my project my.project.
Create a new project.

Declare a Menu Extension


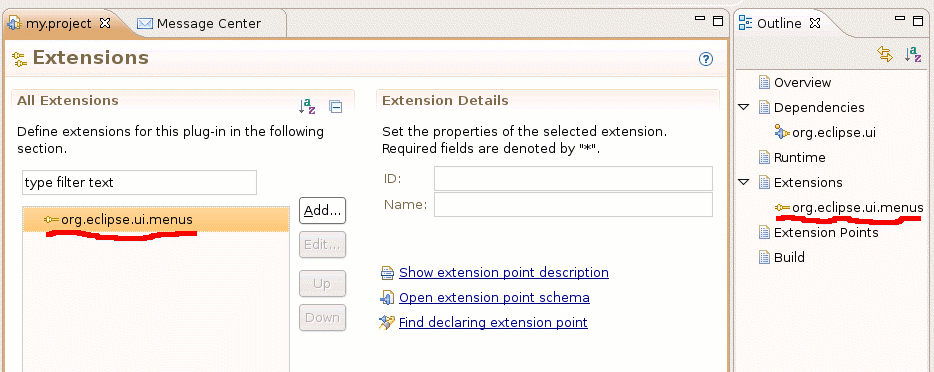
We will declare that we are contributing a menu item in the plugin.xml. To access the menu extension point, we need to declare a plugi-in dependency on org.eclipse.ui. The extension point we are using is org.eclipse.ui.menus.
Add the org.eclipse.ui.menus extension.

Note: we could use the "Hello, World" command contribution as a starting point, but I prefer the agglutinative to the reductive approach as a starting point.

Add a Menu Contribution


Add a menuContribution for the org.eclipse.ui.menus extension.
Set its locationURI to popup:org.eclipse.ui.popup.any?after=additions.
The scheme popup indicates that the menuContibution should appear for context menus. Other valid values are menu and toolbar.
The menu ID org.eclipse.ui.popup.any is a magic string that explains itself. If you would prefer to use resrict the popup contribution to a specific editor or view, then use its unique ID.
The query after=additions indicates that the contribution should appear after the standard IWorkbenchActionConstants.MB_ADDITIONS group. As you might guess, the placement value after might just as well be before.

Create a Dynamic Menu Contribution Node


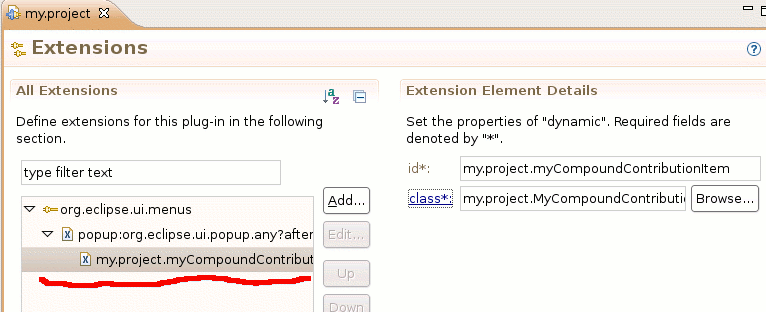
Add a dynamic node to the menuContribution. Here we will declare the org.eclipse.ui.actions.CompoundContributionItem that will create the dynamic menu entries. For this example, I have declared the ID as my.project.myCompoundContributionItem and the class as my.project.MyCompoundContributionItem.
Add a menuContribution to the org.eclipse.ui.menus extension and a dynamic node to the menuContribution.

Create a CompoundContributionItem


Let Eclipse create my.project.MyCompoundContributionItem.java for you and set a Debug breakpoint in the getContributionItems method. We can set the ID as my.project.myCompoundContributionItem and the class as my.project.MyCompoundContributionItem.

Side-note: Debug The Menu Contribution


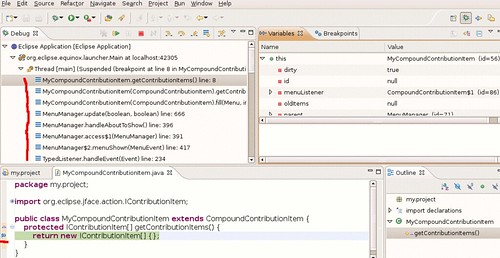
From the plug-in Overview page, in the Testing category, we can launch another Eclipse runtime in debug mode and trace when the getContributionItems method is called. Just set a breakpoint inside the method body, and, when the new Eclipse workbench starts, right-click anywhere in the project explorer. We have configured the dynamic menuContribution to contribute an empty array of IContributionItem to all popup menus. It's not particularly useful, but it's a start.
A trace of the getContributionItems menu being called.

Declare a Command Extension


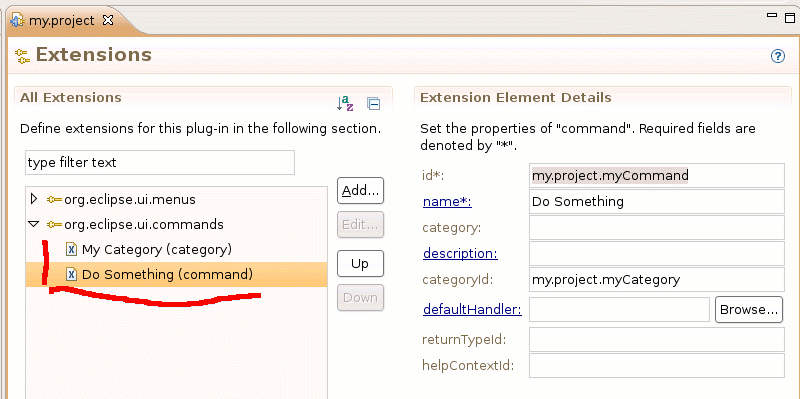
Now that we have declared an org.eclipse.ui.menus extension and added a menuContribution with dynamic content, it should be straightforward for us to declare an org.eclipse.ui.commands extension, with two nodes: one for the category, which is the group in the context menu where our commands will appear, and one for the command declaration.
I have assigned to the category the id my.project.myCategory and name My Category and to the command the id my.project.myCommand, name Do Something and categoryId my.project.myCategory.
The org.eclipse.ui.commands with nodes for a command and for a menu group.

Declare a Command Handler


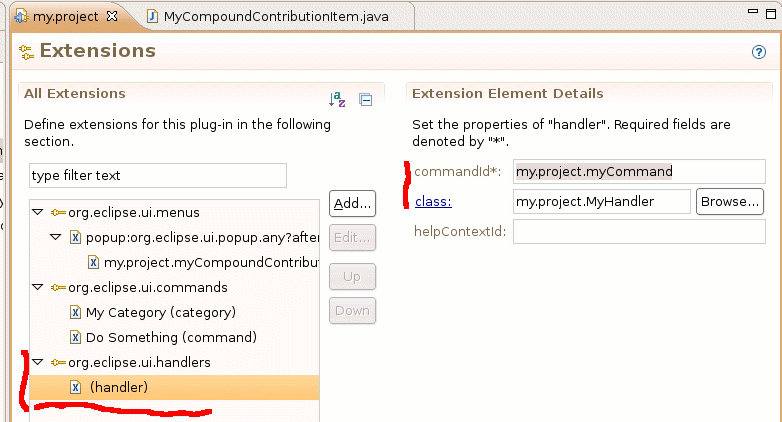
Now that we have an org.eclipse.ui.commands extension, we will add a handler for this command. We just need to declare an org.eclipse.ui.handlers extension with a new handler node and the commandId declared above, my.project.myCommand.
Three declared extensions are used for adding a context menu command with a dynamic label.
We can create a new AbstractHandler implementation, called my.project.MyHandler that looks something like this:

package my.project;

import org.eclipse.core.commands.AbstractHandler;
import org.eclipse.core.commands.ExecutionEvent;
import org.eclipse.core.commands.ExecutionException;
import org.eclipse.jface.dialogs.MessageDialog;
import org.eclipse.ui.handlers.HandlerUtil;

public class MyHandler extends AbstractHandler {
@Override
public Object execute(ExecutionEvent event) throws ExecutionException {
MessageDialog.openInformation(
HandlerUtil.getActiveShellChecked(event), "My Handler",
"Not yet implemented");
return null;
}
}


Add a Simple CommandContributionItem


We are now going back to the MyCompoundContributionItem class to return a CommandContributionItem for the command extension above.
You may need to declare a dependency on org.eclipse.core.runtime to get a code completion for the the PlatformUI#getWorkbench method, which returns an IWorkbench. The active workbench window will suffice as our IServiceLocator. Notice in the implementation below that the label counter (the 4th Constructor parameter from the end for the CommandContributionItem) will be incremented every time a new context menu is opened. This should satisfy our simple requirement for dynamically updating the context menu label.
Similarly, we can dynamically update the icon, tooltip, etc., based on the state of the application (current selection, current perspective, etc.).

package my.project;

import java.util.Collections;

import org.eclipse.jface.action.IContributionItem;
import org.eclipse.swt.SWT;
import org.eclipse.ui.PlatformUI;
import org.eclipse.ui.actions.CompoundContributionItem;
import org.eclipse.ui.menus.CommandContributionItem;


public class MyCompoundContributionItem extends CompoundContributionItem {
private static int counter = 0;
protected IContributionItem[] getContributionItems() {
return new IContributionItem[] {
new CommandContributionItem(PlatformUI.getWorkbench().getActiveWorkbenchWindow(),
"my.project.myCommandContributionItem", "my.project.myCommand",
Collections.emptyMap(), null, null, null,
"Dynamic Menu "+ counter++, null, null, SWT.NONE)
};
}
}

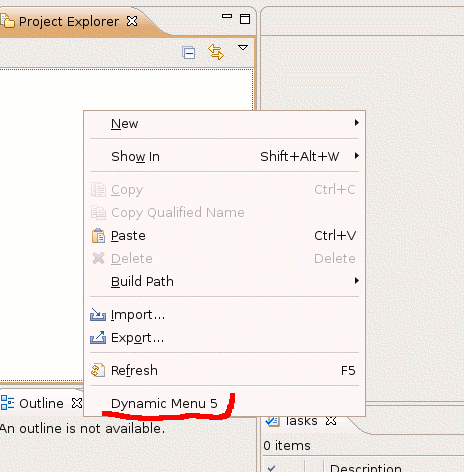
Now we can Launch the Eclipse Application from the Testing section of the Overview tab, right-click a few times and watch as the menu label is updated every time a new context menu pops up!
The dynamic label is updated every time we right-click to open a context menu.


Note: as of Ganymede (Eclipse 3.4), the above constructor for CommandContributionItem has been deprecated. For an example of the class MyCompoundContributionItem for use in Eclipse 3.4, look here.

Monday, December 17, 2007

Nexenta and the Eclipse Debugger

A few nights ago, when I tried to start the Eclipse debugger on Nexenta, I received the following error:

UTF ERROR ["../../../src/solaris/npt/utf_md.c":49]: Failed to complete iconv_open() setup

This seems to be similar to the known Nexenta javaws bug and to a Nexenta Netbeans debugger problem.

Thanks very much to Jeff Moguillansky for helping me to get up and running with this! I replaced my /usr/lib/iconv with the non-open-source files, as he suggested, and was soon running a new Eclipse instance in debug mode.